Navigation: Configuration > Configuration Guide (Web Mode) > Advanced Configuration > Setting Number Conversion Mode >
The number mapping is used to implement irregular number changes.
Context
The priorities of the three number change modes are long number and short number, number mapping, and number change in descending order. If a user meets the conditions of the three number change modes, only the mode with the highest priority is used. If the user has a long number, the long number is displayed on the phone of the called party. The user who does not set the long number can use the mapping number if it is set. The user who does not set the long number and number mapping uses the changed number.
Scenario Description
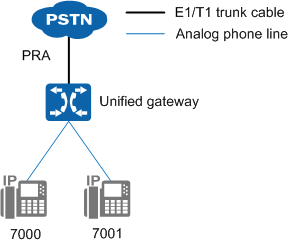
The unified gateway connects to the PSTN through the PRA trunk. Figure 1 shows the network.
Figure 1 Network for the number mapping scenario

Assume that:
ϒ⁄The unified gateway user numbers are 7000 and 7001. The intra-office prefix is 7.
ϒ⁄The unified gateway connects to the PSTN through the PRA trunk. The office route selection code is 1.
ϒ⁄The long numbers allocated by the PSTN to the unified gateway users are 68907000 and 83787001.
Ensure that:
ϒ⁄When a PSTN user dials the unified gateway user number 68907000 or 83787001, the call can be connected normally.
ϒ⁄When the unified gateway user 7000 or 7001 makes an outgoing call to a PSTN user, the calling number 68907000 or 83787001 is displayed on the PSTN user's terminal.
Procedure
1.Log in to the web management system. For details, see Logging In to the Web Management System.
2.Configure the number mapping.
Configure the number mapping for unified gateway users 7000 and 7001.
a.Choose Trunk > Office Route Configuration.
![]()
You can also choose Trunk > Called Prefix Configuration > Advanced to access the Advanced Configuration page.
b.Click Number mapping.
c.Click Create.
d.Configure the number mapping for user 7000, as shown in Figure 2.
Figure 2 Configuring the number mapping for user 7000

Table 1 describes the key parameters displayed on the web page. For details about the parameters, see the Web Management System Online Help.
Table 1 Key parameter description
Parameter |
Description |
Internal number |
Short number used in an intra-office call. |
External number |
Long number allocated by the carrier. |
![]()
It is recommended that a user's short number be the same as the last few digits of the user's long number to facilitate number management.
e.Click OK.
The number mapping for user 7000 is configured successfully.
f.Click Create and configure the number mapping for user 7001 according to Figure 3.
Figure 3 Configuring the number mapping for user 7001

g.Click OK.
3.Configure intra-office prefixes.
Configure intra-office prefixes 68907 and 83787 on the unified gateway. When an out-office user dials 68907000 or 83787001, 68907000 or 83787001 is mapped to the short number 7000 or 7001.
a.Choose Trunk > Called Prefix Configuration.
b.Click Create.
c.Configure prefix 68907, as shown in Figure 4.
Figure 4 Configuring prefix 68907

d.Click OK.
Prefix 68907 is configured.
e.Configure prefix 83787.
Set Prefix to 83787 and set the other parameters to the same as those for prefix 68907.
4.Configure an outgoing prefix.
Configure outgoing prefix 9 on the unified gateway. When an unified gateway user dials 9xxxxxxxx, the first digit 9 of the called number is deleted, and the calling number is mapped from the short number to the long number.
a.Configure the number change index.
i.Choose Trunk > Office Route Configuration.
ii.Click Number Change Index.
iii.Click Create.
iv.Configure the number change index to 0, as shown in Figure 5.
Figure 5 Configuring number change index 0

v.Click OK.
b.Choose Trunk > Called Prefix Configuration.
c.Click Create.
d.Configure prefix 9, as shown in Figure 6.
Figure 6 Configuring prefix 9

e.Click OK.
Prefix 9 is configured.
5.Click Data Save in the upper right corner of the web management system.
Verification
Task |
Operation |
Result |
Make a call to an intra-office user as a PSTN user. |
Pick up the phone and dial 68907000 or 83787001. |
The call is connected. |
Make a call to a PSTN user as an intra-office user. |
Pick up the phone and dial 9 + a PSTN number. |
Number 68907000 or 83787001 is displayed on the called party's phone. |
Parent Topic: Setting Number Conversion Mode