Navigation: Configuration > Feature Guide > Voice Service > Emergency Call >
Data Plan
The following assumes that Unified Gateway X1900 Series connects to the PSTN through a SIP trunk, and office route 187 is used to route outgoing calls. The following describes configurations on the PBX and IP phone in the emergency call scenario to implement the following requirements:
ϒ⁄Intra-office user 8000 can dial emergency number 911 on the PSTN in case of emergencies. Both the office route and office route selection code for routing calls to the PSTN are 0.
ϒ⁄The calling number displayed to the called party is 8113000 so that the called party can call back.
ϒ⁄The called party control function is enabled. After the calling party hangs up, the calling party can pick up the phone within 60s to resume the call as long as the called party does not hang up. If the calling party does not pick up the phone within 60s, the call is automatically released.
Configuration on the PBX
1.Log in to the web management system of the Unified Gateway X1900 series as the administrator.
2.Configure trunk data for connecting to the virtual device.
a.Create office route selection code 0.
Choose Trunk > Office Route Configuration > Office Route Selection Code, click Create, and configure data, as shown in Figure 1.
Figure 1 Creating office route selection code 0

b.Create office route 0.
Choose Trunk > Office Route Configuration > Office Route, click Create, and configure data, as shown in Figure 2.
Figure 2 Configuring office route 0

c.Create emergency call prefix 110.
Choose Trunk > Called Prefix Configuration, click Create, and configure data, as shown in Figure 3.
Figure 3 Creating emergency call prefix 110

d.Create a virtual SIP trunk.
Choose Trunk > Trunk Configuration > SIP, click Add A Peer Office, click the red line that is generated, and configure data, as shown in Figure 4 Set IP address of the peer office to a nonexistent one.
Figure 4 Creating a virtual SIP trunk

3.Configure an anonymous call domain name.
a.Log in to a X1900 series unified gateway using the CLI and access the Config mode.
b.Configure an anonymous call domain name.
config set anonymouscall ip 10.254.254.254 cardid emergency_call
4.Create a call source and a rerouting policy.
a.Create call source 10.
config add callsource no 10
b.Configure a rerouting policy to reroute calls that are from call source 10 and destined at office route selection code 0 to office route 187 of the PSTN.
config add routeanalysis officeselectcode 0 callsourceno 10 officeno 187
5.Associate the virtual SIP trunk and user 8000 with the call source.
a.View the trunk group number corresponding to office route 0 of the virtual SIP trunk.
According to the command output, the trunk group number corresponding to office route 0 is 7.
b.Associate the virtual SIP trunk with call source 10.
config modify trunkgroup no 7 callsourceno 10
c.Associate the user 8000 with call source 10.
config modify subscriber dn 8000 callsourceno 10
6.Configure the calling number displayed to the called party to 81130000 for call source 10.
config add emergency caller callsourceno 10 number 81130000
7.Enable the called party control function.
config emergency call parameter calledpartycontrol yes releaseprotecttime 60
![]()
When the time specified by releaseprotecttime elapses after the calling party hangs up, the call is automatically released. If releaseprotecttime is set to 0, the call will never be released as long as the called party does not hang up.
8.Run the save command to save the configuration.
Configuration on the IP Phone
1.Log in to the web management system of the IP phone.
2.Export the configuration file.
a.Choose Advanced > Configuration File, and click Export.
b.In the File Download dialog box, click Save.
c.Select a directory for saving the configuration file and click Save.
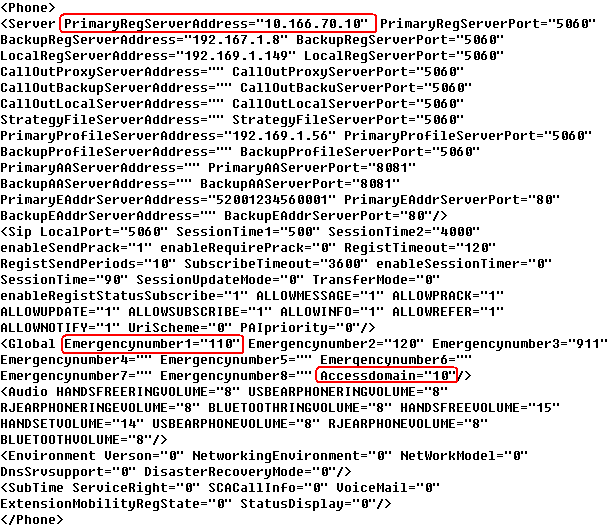
3.Open the configuration file in the Notepad, and configure the IP address of Unified Gateway X1900, emergency call prefix, and call source, as shown in Figure 5.
Figure 5 Modifying the configuration file

Parameter |
Description |
PrimaryRegServerAddress |
IP address of the SIP server. |
Emergencynumber1 |
Emergency call prefix. |
Accessdomain |
Call source. |
4.Import the configuration file.
a.Choose Advanced > Configuration File, and click Browse.
b.Select the configuration file and click Open.
c.Click Import.
The configuration file is imported and the phone restarts.
Configuring the Service of Generating Two CDRs for an Emergency Call
1.Log in to the unified gateway through the CLI and enter the Config mode.
2.Enable software parameter 539.
config softargu type 539 value 1
Parent Topic: Emergency Call