Wireless Gateway connects with FreeSwitch1.10.5
This document mainly describes the detailed steps of connecting the wireless gateway with FreeSwitch.
Follow the steps below to configure two-way calls between the phone and the gateway:
Outgoing call: from FreeSwitch SIP extension 1000 to the gateway through relay 1008;
Incoming call: call from an outside line to the gateway, through SIP 1020 to FreeSwitch, and then send the call to the 1000 SIP extension through FreeSwitch;

Step1.Create a SIP Trunk in FreeSWITCH
Enter the directory of FreeSWITCH’s default configuration directory, add the gateway’s configuration in /etc/freeswitch/directory/default/1008.xml
vi /etc/freeswitch/directory/default/1008.xml
<include>
<user id=”1008″>
<params>
<param name=”password” value=”1008″/>
<param name=”vm-password” value=”1008″/>
</params>
<variables>
<variable name=”toll_allow” value=”domestic,international,local”/>
<variable name=”accountcode” value=”1008″/>
<variable name=”user_context” value=”default”/>
<variable name=”effective_caller_id_name” value=”1008″/>
<variable name=”effective_caller_id_number” value=”1008″/>
<variable name=”outbound_caller_id_name” value=”$${outbound_caller_name}”/>
<variable name=”outbound_caller_id_number” value=”$${outbound_caller_id}”/>
<variable name=”callgroup” value=”techsupport”/>
</variables>
</user>
</include>
| parameter name | value |
| user id | 1008 |
| password | 1008 |
| effective_caller_id_name | 1008 |
| effective_caller_id_number | 1008 |
Step 2.Creat extension 1000 in Freeswtich
Edit 1000.xml in /etc/freeswitch/directory/default/ .
<include>
<user id=”1000″>
<params>
<param name=”password” value=”1000″/>
<param name=”vm-password” value=”1000″/>
</params>
<variables>
<variable name=”toll_allow” value=”domestic,international,local”/>
<variable name=”accountcode” value=”1000″/>
<variable name=”user_context” value=”default”/>
<variable name=”effective_caller_id_name” value=”Extension 1000″/>
<variable name=”effective_caller_id_number” value=”1000″/>
<variable name=”outbound_caller_id_name” value=”$${outbound_caller_name}”/>
<variable name=”outbound_caller_id_number” value=”$${outbound_caller_id}”/>
<variable name=”callgroup” value=”techsupport”/>
</variables>
</user>
</include>
| parameter name | value |
| user id | 1000 |
| password | 1000 |
Step 3.Dialing Rules in FreeSWITCH
Outbound rules realize dialing “9+destination number ” to the remote part, and 9 can be replaced by any other digital.
Edit the outband dialplan in /etc/freeswitch/dialplan/default.xml
<extension name=”outbound”>
<condition field=”destination_number” expression=”^9(\d+)$”>
<action application=”answer”/>
<action application=”set” data=”ringback=${us-ring}”/>
<action application=”bridge” data=”sofia/internal/[email protected]″/>
</condition>
</extension>
| parameter name | value |
| extension name | outbound |
| expression | ^9(\d+)$, ^marks the beginning of the match, $ marks the end of the match.
\d means 0-9, + will match one or more numbers. So ^9(\d+)$ will match all phone number which starts with 9. And it will save all numbers which is behind 9 to $1 |
| data | sofia/internal/[email protected] |
If you want to know more about regular expression, you can google PCRE regular expression.
Inbound rules realize all incoming calls transfer to SIP extension 1000.
Edit the inbound dialplan in /etc/freeswitch/dialplan/public/00_inbound_did.xml.
<include>
<extension name=”public_did”>
<condition field=”destination_number” expression=”1020″>
<action application=”set” data=”domain_name=$${domain}”/>
<action application=”transfer” data=”1000 XML default”/>
</condition>
</extension>
</include>
| parameter name | value |
| expression | 1020 |
| data | 1000 XML default |
Step 4. Set Network Parameters in Web
Log in to the network in the browser, and click “Network -> LAN Settings” to set your network parameters. The figure below is an example for reference only.
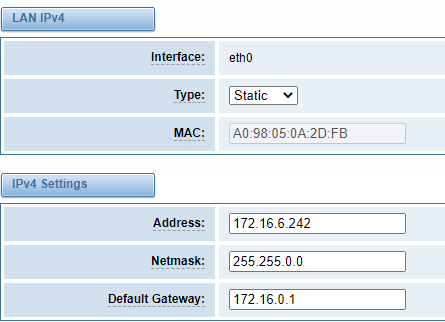
Save your changes. Please type in your DNS server in “DNS Server Address”.
Step 5. Create a SIP Endpoint in Web
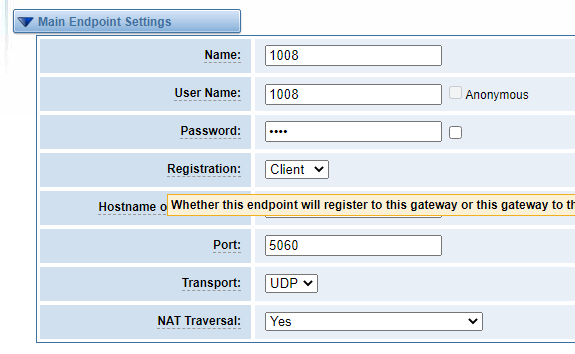
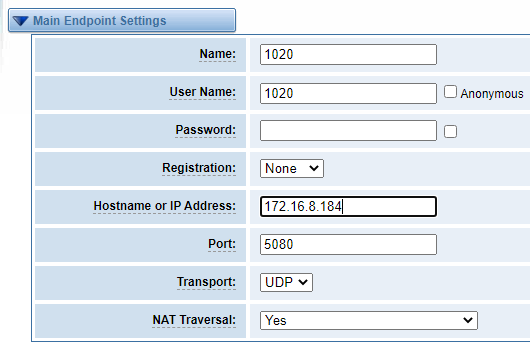
Please select “SIP—>SIP Endpoints—>Add New SIP Endpoint” to set SIP trunk 1008 and endpoint 1020. The following figure shows detail information about how to set it.
| parameter name | value |
| name | 1008 |
| user name | 1008 |
| password | 1008 |
| hostname or IP Address | 172.16.8.184, your PBX IP |
About other parameters in SIP, please set by your requirements for there is no need to set them in simple calls.
Step 6. Set Routing Rules in Web
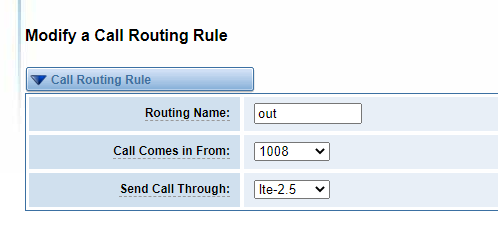
Click “ROUTING—> Call Routing Rules—> New Call Routing Rule” to set outbound and inbound routing rules like the following:
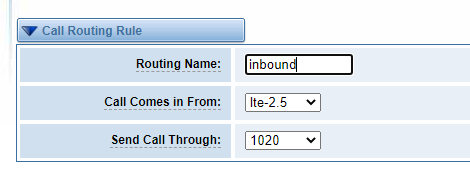
Save the inbound call routing rules, please set the outbound rules as introduced. In order to make all calls successfully, please enable and set failover function in advanced routing rule like that:

Please save all your changes to make effect.
Step 7. Register a SIP extension by software
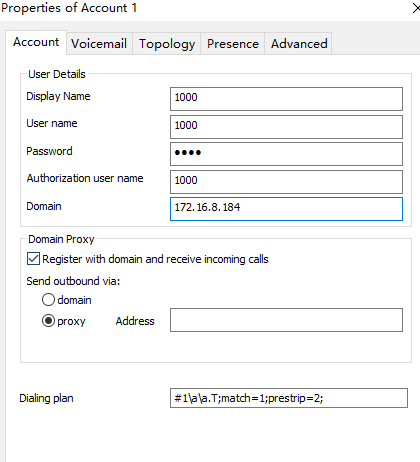
Taking advantage of SIP software such as Xlite, eyeBeam to register a SIP extension(1000). After all above steps, you can try to make calls and send SMS.
Test call:
Incoming call test: Dial the number of port 2.5 on the gateway via your mobile to see if 1000 will ring. If 1000 rings, it means your configuration is successful; unless, it means there is something wrong with your configuration, please check it.
Outgoing call test: Dial your mobile number on 1000 extension registered in a software phone. If your mobile rings, it means your configuration is ok; unless, please check your configuration.
