The DTU(L) series digital service board is a VoIP trunking service board designed for carriers and call centers based on Asterisk open source software. It is a converged multimedia service board that can connect traditional telephone system with IP network and realize the seamless connection between VoIP PBX and PSNT.The user-friendly interface and simple operation make it easy for users to set up personalized services. Users can realize secondary development of service functions through AMI (Asterisk Management Interface).
DTU(L) series digital service board supports 1/2/4 optional T1/E1/PRI interfaces and up to 30/60/120 concurrent calls. "L" stands for the device without hardware codec module V100, which supports various codecs and signaling, including G.711A, G.711U, G.729, G.722, G.723 and GSM. The DTU(L) series digital service boards are perfectly compatible with SIP servers such as Asterisk, Elastix, trixbox, 3CX, FreeSWITCH and other VoIP operating platforms.
Product Details
Model |
DTU-1 |
DTU-2 |
DTU-4 |
DTU-1L |
DTU-2L |
|---|---|---|---|---|---|
E1/T1 port |
1 |
2 |
4 |
1 |
2 |
Codec & EC module |
Yes |
No |
|||
Size |
100*162.5mm |
||||
Weight |
210g |
216g |
226g |
206g |
207g |
Temperature: |
Storage temperature: -40~80 |
||||
Working temperature:0~70 |
|||||
Operating humidity |
10%~90% Non-condensing |
||||
Maximum power |
12W |
||||
Physical interfaces and properties
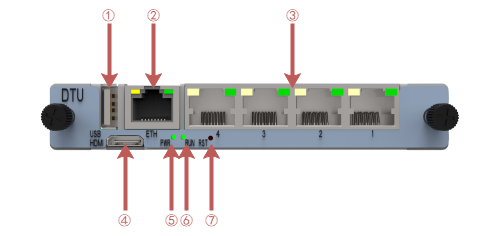
Serial number |
Interface |
Function |
Color |
Working Status |
|---|---|---|---|---|
1 |
USB |
USB interface |
||
2 |
ETH |
Network Interface |
||
3 |
Port1-4 |
E1/T1 ports. Different models have different port numbers, from 1 to 4 |
||
4 |
Mini HDMI |
HD multimedia interface |
||
5 |
PWR |
Power indicator status |
Green |
On: Power supply |
Off: No power supply |
||||
6 |
RUN |
System operation light status |
Green |
Slow flashing (green light on 2s, and flashing 0.1s): normal operation |
Fast flashing (green light on 0.5s, and flashing 0.5s): not working properly |
||||
No flashing: Driver abnormalities |
||||
7 |
RST |
Reset button, used to restore factory settings |
||
Connect DTU(L) digital service board
The DTU series digital service board is designed for easy configuration and installation. To connect the DTU digital service board, please follow the steps below.
1. Make sure the UCP chassis has a switch board and plug the Ethernet cable into the LAN port of the switch board.
2、Insert the DTU series digital service board into the chassis slot.
3、Plug the power adapter into the chassis power port and connect it to the wall outlet to power on.
Configure DTU(L) digital service board
The default factory IP address is: 172.16.80.X (where X indicates the slot number where the DTU service board is inserted into the chassis slot)
DTU series digital service board can be configured through the Web browser of PC, please refer to the following steps.
1、Please use the correct specification AC/DC to power your UCP chassis.
2、Open a web browser on your PC.
3、Enter the IP address of the DTU digital service board in the address bar of the browser.
4. Enter the administrator password to access the Web Configuration menu (by default, the administrator user name and password is admin).
Note: Make sure your computer has an IP address in the range of 172.16.80.XXX so that you can access the Web GUI of the DTU Digital Service Board.
How to determine whether the DTU(L) digital service board is working properly
After the DTU series digital service board is inserted into the chassis, you can judge whether it is working normally by the following ways.
1、After the UCP chassis is powered on, the PWR power indicator is always on.
2、When the DTU series digital service board system is running normally, the run status indicator SYS is in green slow flashing state (green light is on for 2s, and flashing for 0.1s).
3、Before accessing E1 line, the E1 port indicator is in red slow flashing state (light 0.5s, off 0.5s).
4、After inserting the E1 line, the E1 port indicator is in the green long light state.
5、The Web GUI of DTU digital service board can be accessed normally with a computer web browser.
Parent topic: Quick Installation Guide