Navigation: Configuration > Feature Guide > Voice Service > Hotline >
POTS Phone Directly Connected to the X1900
1.Use an administrator account to log in to the web management system of a X1900 series unified gateway.
2.Choose User > POTS User.
3.Select the user number to be assigned the service permission and click Service Configuration.
4.Under Complex service, click Configure next to Hotline.
5.In the Configure Hotline dialog box that is displayed, select Instant hotline or Delay hotline.
Figure 1 Configuring the hotline service

6.Click OK.
7.In the upper right corner of the web page, click ![]() to save the configuration.
to save the configuration.
IP Phone
The following uses an IP phone 7910 as an example to describe the configuration procedure.
1.Use an administrator account to log in to the web management system of an IP phone 7910.
2.Choose Call Settings > Hotline.
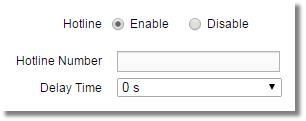
3.Select Enable and set the number and delay time. To enable the instant hotline service, set Delay Time to 0 s; to enable delayed hotline service, set Delay Time to a non-zero value.
Figure 2 Enabling the hotline service

4.Click Save to save the settings.
POTS Phone Under the IAD
1.Use an administrator account to log in to the web management system of an IAD.
2.Choose SIP Service Configuration > SIP Hotline.
3.Select the number for which you want to enable the hotline service and set Hotline and Hotline Delaytime(s).
To enable the instant hotline service, set Hotline Delaytime(s) to 0. To enable the delay hotline service, set Hotline Delaytime(s) to a non-zero value.
Parent Topic: Hotline