B400P/E BE400P/E Hardware Manual


Safety Instructions
- (a) The B400P/E BE400P/E is subject to specific national safety regulations during application.
- Turn off the power before installing the B400P/E BE400P/E.
- To prevent damage to the board by electrostatic induction, snap the card stopper to the PC with screws for grounding.
- (b) The electrostatic ring is essential during installation.
- Please follow the instruction steps.
Chapter 1 Overview
1.1 B400P/E BE400P/E Introduction
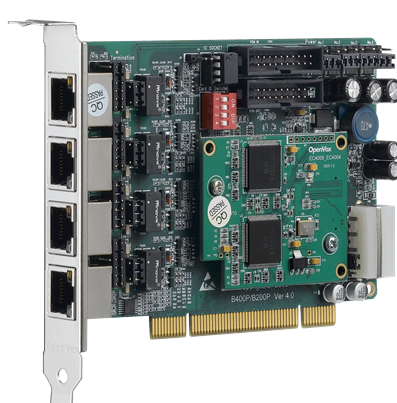
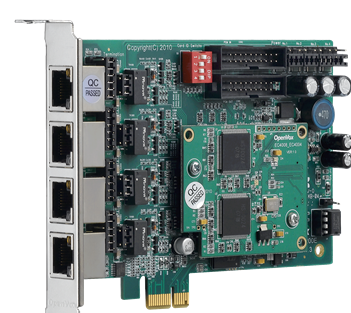
The OpenVox B400P/E BE400P/E is a PCI 2.2 compliant BRI card with four S/T interfaces, each of which can be set to TE or NT mode via jumpers. BRI equipment into powerful VOIP voice equipment, providing a software migration solution from ISDN technology to the new world of voice over IP.
The B400P/E BE400P/E works well with GPL-compliant linux kernel drivers to connect your linux machine to ISDN BRI networks. It can be used as a PBX, IVR, and VoIP gateway.
Typical Applications
- High performance ISDN BRI voice boards
- ISDN BRI private automatic switch
- ISDN BRI Network Routing
- VoIP Voice Gateway
- ISDN PBX Trunking
- ISDN BRI Test Equipment
Key Features
- Integrated 4 S/T interfaces
- Support PCI 2.2 or above specification, provide 3/5V voltage
- Single board supports four 4-pin RJ45 connectors
- Support TE/NT mode, comes with NT mode power supply chip
- Daisy chain PCM bus connection
- 32-bit bus controller supports DMA data exchange at rates up to 133Mb/s
- DTMF detection for each B-channel
- Hardware echo cancellation for premium voice (supported by BE400)
- Multi-party voice conference bridging
- Fully compatible with NET ISDN, mISDN driver, DADHI and other drivers
- ITU-T I.430 and TBR 3 certified
- RoHS
Certified
- CE, FCC, A-Tick
- Issabel
Chapter 2 Hardware Installation
2.1 Power Supply
The B400P/BE400P board needs only 3.3/5V from the PCI slot when working in TE mode. When working in NT mode, users need to provide external power to the board through the 12V 4-PIN D-type connector, otherwise it will not work properly.
The B400E/BE400E boards only need 3.3/12V from the PCI-E slot when working in TE/NT mode, no external power supply is required.
2.2 Slots
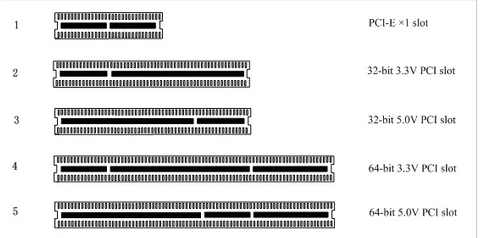
The B400P/BE400P is compatible with industry standard 32-bit 3.3V, 32-bit 5.0V, 64-bit 3.3V, and 64-bit 5.0V PCI slots, and is not compatible with any type of PCI-E slots. Users should first confirm the slot type and insert the B400P/BE400P vertically into any of the PCI slots. The following figure depicts the five slot shapes.
The B400E/BE400E are compatible with industry standard PCI-E ×1, ×2, ×4, ×8 and ×16 slots. Users should first confirm the slot type and insert the B400E/BE400E vertically into any of the PCI-E slots. The following diagram depicts the five slot shapes.

Figure 1 PCI and PCI-E Slot
2.3 Setting Card ID
If you need to install multiple voice cards of the same model on one server, then you need to set up the Card ID.
- (a) The ID of the first card must be set to 0, the second card must be set to 1, and so on.
- The first card is the one that is initialized first when the system boots. In most cases, Linux will initialize PCI devices in order, and the PCI device closest to the CPU will be initialized first. That is, if there are multiple B400/BE400s installed on the same server, the card ID of the one closest to the CPU must be set to 0.
2.4 Adjusting the terminal S/T interface mode
The interface of B400P/E BE400P/E can be set to NT or TE mode, please refer to the following figure.
- If the interface needs to work in NT mode, the jumper should be set to connect.
- If working in TE mode, the jumper should be set to disconnect in theory, but the B400P/E BE400P/E may be connected to some non-standard ISDN terminal devices which do not have terminal resistors, and the jumper should be set to connect in this case.

Figure 2 B400P/E BE400P/E jumper setting
2.5 Power supply setting
These jumpers control whether power is supplied to the external ISDN terminal and should be set by the user according to the following prompts.
- (a) If the port is operating in TE mode, the power jumper should be set to disconnect.
- if the port is operating in NT mode, the power jumper should be set to connected, but if the connected device is self-powered, then the jumper should be set to disconnected
- If one of the power jumpers is set to connected, then the user needs to provide external power to the board through the 12V 4-PIN D-type connector, otherwise it will not work properly.
- PCI slots generally provide 3V/5V voltage, but some computers in which PCI slots no longer provide 5V voltage, then the voltage selection jumper should be set to 3.3V input.
- PCI-E slots generally provide 3V/12V voltage, you can select the PCI-E output voltage from the motherboard settings in your computer.
2.6 Hardware Installation Steps
- Power off the computer, remembering to unplug the AC power cord.
- Make sure the jumpers are set correctly.
- check that the Card ID is set correctly first when installing multiple cards.
- Confirm the slot type and insert the B400P/E BE400P/E vertically into the slot.
- If there is a port working in NT mode, insert the 12V 4-PIN D-type connector into the corresponding power connector on the board.
- Set the ISDN telephone line access to the S/T port in TE mode and the ISDN terminal access to the S/T port in NT mode.
- Fixing the board and grounding it.
- Plug in the power cord and power on.
Note : As long as there is a port operating in NT mode, an external power supply is required. Static loops are essential during the above operation, and installation or removal of the board should only be done after power is removed. Please check the availability of ISDN line and ISDN terminal before connecting the hardware. After making sure the hardware is installed correctly, you can start the software installation.
Chapter 3 Reference Table of Contents
Warm Tips.
If users encounter any problems during installation and use, please find answers and leave messages on OpenVox forum or wiki.
Appendix A Hardware Specifications
– Weight, Size
Weight (g) : 98g (B400P) 17g (EC module)
Weight(g) : 98g (B400E) 17g (EC module)
Dimensions(cm) : 14.0×9.5×1.6
– Interface
Interface: 4-pin RJ45 interface, providing four ISDN S/T interfaces
PCI: 3.3/5V, PCI 2.2 specification or higher
PCI-E: 3.3/12V, PCI Express 1.0 specification or higher
Power connector: 12V 4-pin connector (for NT mode power supply)
-Environment
Temperature: 0 ~ 50°C (working)
– 40 ~ 125°C (Storage)
Humidity: 10 ~ 90% non-condensing
-Power consumption
Voltage: 3.3/5V, 38V (NT mode only)
B200P power loss: min. 0.74W, max. 4.7W
B200E power loss: min. 0.97W, max. 4.7W
– Hardware and software configuration requirements
RAM 128+ MB
Linux kernel 2.4.X or 2.6.X
CPU 800+ MHZ
Appendix B RJ45 Pin Assignment
ISDN BRI has two kinds of interfaces: U interface and S/T interface. B400P/E BE400P/E provides a four-pin S/T interface. We illustrate the pin assignments with the following two tables.
l ISDN U interface
| 8-pin RJ45 connector | Pins | Color | Description |
| 1 | White/Orange | N/A | |
| 2 | Orange | N/A | |
| 3 Orange | White/Green | N/A | |
| 4 | Blue | U interface | |
| 5 | White/Blue | U interface | |
| 6 | White | N/A | |
| Green | White/Brown | -48VDC Power (optional) | |
| White | Brown | -48VDC Return (optional) |
The ISDN U interface is typically used in North American ISDN networks and uses a standard 8-pin RJ45 connector, but only the center two pins (4 and 5) are used, forming a two-conductor crossover. The optional -48 VDC power pin can be defined by pins 7 and 8 of the RJ-45. This can be used to power NT-1 or TE devices when needed. In most cases, the telephone company does not provide a feed.
l ISDN S/T Interface
| 8-pin RJ45 connector | Pin | Color | Description |
| 1 | White/Orange | N/A | |
| 2 | Orange | N/A | |
| 3 Orange | White/Green | Receive+ | |
| 4 | Blue | Transmit + | |
| 5 | White/Blue | Transmit – | |
| 6 | Green | Receive – | |
| 7 | White/Brown | -48VDC Power(optional) | |
| 8 | Brown | -48VDC Return (optional) |
The ISDN S/T interface also uses a standard 8-pin RJ45 connector, but only four of the pins (3, 4, 5 and 6) are used, forming a four-core straight-through line. Of these, 4 and 5 are used for transmit and 3 and 6 are used for receive. The optional -48 VDC power pins can also be defined by pins 7 and 8 of the RJ-45 and are used to power NT-1 or TE devices when needed.
