OpenVox Document Center OpenVox Document Center
  • Home 
  • Products 
  • Solutions 
  • Resources 
    • Document Center 
    • Datasheets 
    • Firmwares 
    • Videos 
  • Partners 
  • Blog 
  • Company 
OpenVox Document Center OpenVox Document Center
OpenVox Document Center
  • Home 
  • Products 
  • Solutions 
  • Resources 
    • Document Center 
    • Datasheets 
    • Firmwares 
    • Videos 
  • Partners 
  • Blog 
  • Company 

Analog Gateway

  • folder icon closed folder iconUser Manual
    • iAG200/400 Series Analog Gateway User Manual
    • iAG800 V2 Series Analog Gateway User Manual
    • iAG801 Series Analog Gateway User Manual
    • MAG Series Analog Gateway User Manual
    • VoxStack Series Analog Gateway
    • VS-GWM801 Series Analog Gateway
  • folder icon closed folder iconApplication Notes
    • OpenVox TR069 Technote
    • iAG200/400 Analog Gateway Quick User Guide
    • iAG800 V2 Analog Gateway Quick User Guide
    • MAG1000 Analog Gateway Quick User Guide
  • folder icon closed folder iconFAQ
    • Comparison Table of Functional Differences between New and Old Architecture of Analog Gateway
    • Frequently Asked Questions
  • folder icon closed folder iconFunctions Guide
    • Analog Gateway FXO connect with Freepbx15
    • Analog Gateway FXO connect with asterisk16.15.1
    • Analog Gateway FXO connect with OpenVox UC
    • Analog Gateway FXO connect with Issabel
    • Analog Gateway FXS connect with 3CX
    • Analog Gateway FXO connect with 3CX
    • Network disconnection escape
    • PEER-PEER GATEWAY SCENARIO
    • SNMP Guide on Analog gateway
    • RJ21 Cable Instruction(MAG1000/MAG1100)
    • Analog Gateway mutiple FXS blinding single SIP account
    • Analog Gateway FXS configure TLS and SRTP with Openvox UC
    • Analog Gateway FXS configure TLS and SRTP with Grandstream UCM6202
    • Analog Gateway FXS configure TLS and SRTP with Yeastar S20 VoIP PBX
    • Auto Provision Guide
loading
Popular Searches
  • Array
  • Array
  • Array
  1. Home
  2. Docs
  3. Analog Gateway
  4. Functions Guide
  5. Analog Gateway FXO connect with Issabel
Updated on April 19, 2023

Analog Gateway

  • folder icon closed folder iconUser Manual
    • iAG200/400 Series Analog Gateway User Manual
    • iAG800 V2 Series Analog Gateway User Manual
    • iAG801 Series Analog Gateway User Manual
    • MAG Series Analog Gateway User Manual
    • VoxStack Series Analog Gateway
    • VS-GWM801 Series Analog Gateway
  • folder icon closed folder iconApplication Notes
    • OpenVox TR069 Technote
    • iAG200/400 Analog Gateway Quick User Guide
    • iAG800 V2 Analog Gateway Quick User Guide
    • MAG1000 Analog Gateway Quick User Guide
  • folder icon closed folder iconFAQ
    • Comparison Table of Functional Differences between New and Old Architecture of Analog Gateway
    • Frequently Asked Questions
  • folder icon closed folder iconFunctions Guide
    • Analog Gateway FXO connect with Freepbx15
    • Analog Gateway FXO connect with asterisk16.15.1
    • Analog Gateway FXO connect with OpenVox UC
    • Analog Gateway FXO connect with Issabel
    • Analog Gateway FXS connect with 3CX
    • Analog Gateway FXO connect with 3CX
    • Network disconnection escape
    • PEER-PEER GATEWAY SCENARIO
    • SNMP Guide on Analog gateway
    • RJ21 Cable Instruction(MAG1000/MAG1100)
    • Analog Gateway mutiple FXS blinding single SIP account
    • Analog Gateway FXS configure TLS and SRTP with Openvox UC
    • Analog Gateway FXS configure TLS and SRTP with Grandstream UCM6202
    • Analog Gateway FXS configure TLS and SRTP with Yeastar S20 VoIP PBX
    • Auto Provision Guide

Analog Gateway FXO connect with Issabel

Estimated reading: 4 minutes 1384 views

This document mainly describes the detailed steps of connecting the analog gateway with Issabel.

Follow the steps below to configure two-way calls between the phone and the gateway:

Outgoing call: from Issabel SIP extension 300 to the gateway through relay 2002;

Incoming call: call from an outside line to the gateway, through SIP trunk 2002 to Issabel, and then send the call to the 6103 SIP extension through Issabel;

The operation steps are divided into two steps, they are the configuration on the issabel and the configuration on the analog gateway
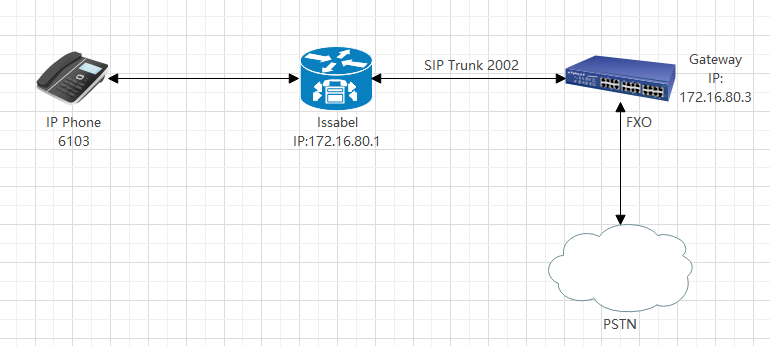
C:\Users\admin\Documents\tongda\ispirit\{26B98D80-C59A-6BDD-A228-B2510BC15C3E}_408\msg\image\407\20221014164550.png

Step 1.Configuration on Issabel

1, Go to PBX-PBX Configuration-Extensions, choose generic sip device. Then click submit to create extension 6103.

word image 8

The specific parameters are as follows, where secret is the extension’s registration password, which must contain both numbers and letters, and it is necessary to set the registration password.

word image 9

After configured, please scroll to the bottom and click ‘submit’ to save the configuration.

word image 10

2, Go to PBX Configuration-Trunk, choose Add sip trunk to create SIP trunk 2002.

word image 11

The specific parameters are as follows, it should be noted that we need to add a rule under the option Dialed Number Manipulation Rules, enter in the match pattern: X. It means that all numbers are wildly matched. The parameters under PEER Details settings need to be filled in strict accordance with this format.

username=2002

type=peer

secret=12345678

qualify=yes

insecure=invite,port

host=172.16.80.3

dtmfmode=rfc2833

context=from-pstn

The secret parameter is only the registration password of the relay, the host parameter refers to the IP address of the simulated gateway at the opposite end, and the Register String setting also needs to follow a unified format, which is: Name: Registration Password @IP address of the opposite end The IP address of the gateway, such as this example 2002:[email protected], and please don’t forget to click the submit changes button at the bottom to save your settings after this setup is completed.

word image 12

3, Go to PBX-PBX Configuration-outbound routes choose Add Route to create outbound route.

word image 13

The specific parameters are as follows, also we need to add a rule under the option Dialed Number Manipulation Rules, enter: X. in the match pattern to match all numbers. Please remember to save your settings by using the submit changes button at the bottom of the screen.

word image 14

4, Go to PBX-PBX Configuration-inbound routes choose Add Incoming Route to create inbound route.

word image 15

The specific parameters are as follows. After configured don’t forget to click submit changes button to save your setting.

word image 16

Step 2. Configuration on analog gateway

1,Go to VoIP-SIP Endpoints and click add button to add sip trunk 2002

word image 17

The specific parameters are as follows. Please make sure the username, password and IP address correct. After configured, don’t forget to click save button to save it. word image 18

Go to System-status-SIP Status to check if sip trunk worked.

word image 19

2,Go to Routing-Call Routing rules and click add button to create inbound/outbound rules.

word image 20

First, create an outbound route. ‘Call Comes in From’ should be set with PSTN line. In this example we are using the fxo-1. ‘Send Call Through’ should be set with sip-2002. After configured, don’t forget to click save button to save it.

word image 21

Then, create an inbound route. ‘Call Comes in From’ should be set with sip-2002. Send Call Through should be set with fxo-1. After configured, don’t forget to click save button to save it. word image 22

Taking advantage of SIP software such as Xlite, eyeBeam to register a SIP extension(6103). After all above steps, you can try to make calls.

Test call:

Make sure PSTN line has been plug into the fxo-1. Use extension 6103 to dial your mobile phone number see if your mobile phone rings. If your mobile rings, it means your configuration is ok; unless, please check your configuration.


Still stuck? How can we help?

Was this page helpful? Yes 1 No

How can we help?

Leave a Comment Cancel reply

CONTENTS

Copyright © 2002-2024 OpenVox all rights reserved.