Analog Gateway FXO connect with 3CX
This document mainly describes the detailed steps of connecting the analog gateway with 3CX.
Follow the steps below to configure two-way calls between the phone and the gateway:
Outgoing call: from 3CX SIP extension 300 to the gateway through relay 10000;
Incoming call: call from an outside line to the gateway, through SIP trunk 10000 to 3CX, and then send the call to the 300 SIP extension through 3CX;

In the following steps, the parameters below are mandatory configurations, and other parameters can be configured according to your needs.
Step1. Create a SIP Trunk in 3CX web
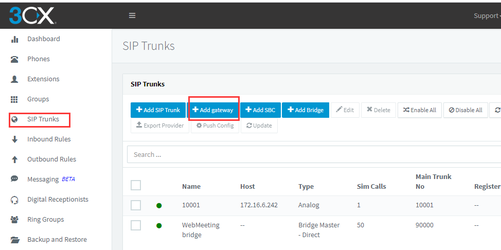
Please select “SIP Trunks—> Add Gateway” to create a SIP trunk:
After that, please click the next button to the following page :
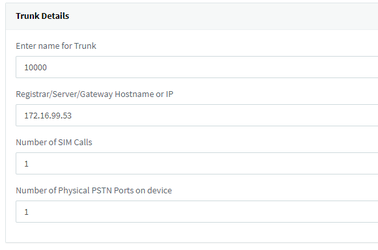
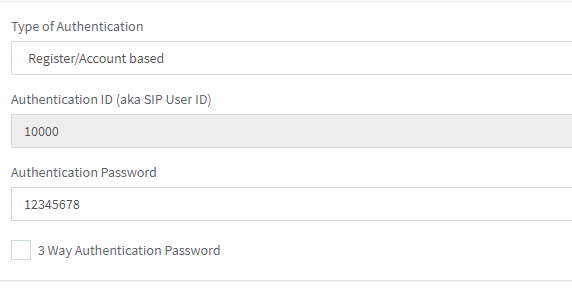
| parameter name | value |
| main trunk No | 10000 |
| trunk name | 10000 |
| Number of SIM Calls | 1 |
| Type of Authentication | register account based |
| Authentication Password | 12345678 |
Step 2. Create extension 300
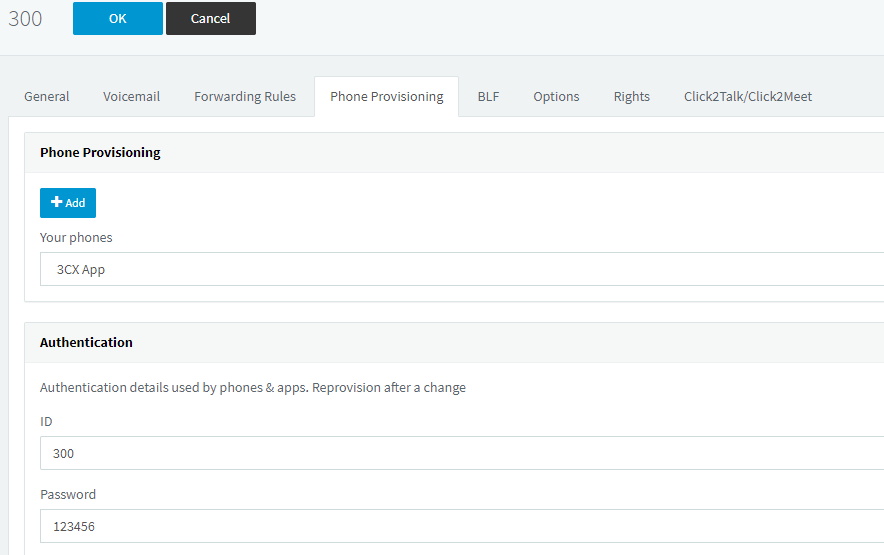
| parameter name | value | |
| extension | 300 | |
| ID | 300 | |
| password | 123456 |
Step 3. Dial rules in 3CX web
Click Inbound Rules—>Add DID to set inbound rules
Inbound routing rules:
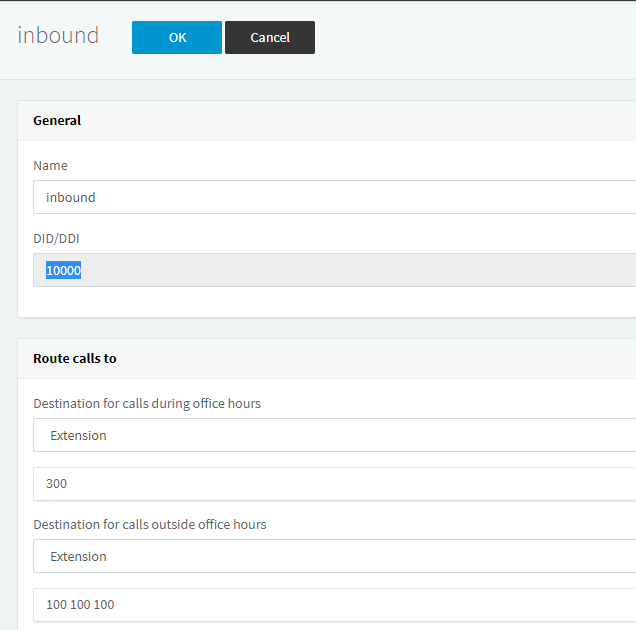
| parameter name | value | |
| name | inbound | |
| DID | 10000 | |
| Destination for calls during office hours | Extension 300 |
Click Outbound Rules—>Add Outbound to set outbound rules
| parameter name | value | |
| Rule name | outbound | |
| route | 10000 |
Step 4. Set Network Parameters in Web
Log in to the network in the browser, and click “Network -> LAN Settings” to set your network parameters. The figure below is an example for reference only.
Save your changes. Please type in your DNS server in “DNS Server Address”.
Step 5. Create a SIP Endpoint in Web
Please select “SIP—>SIP Endpoints—>Add New SIP Endpoint” to set SIP trunk. The following figure shows detail information about how to set it.
About other parameters in SIP, please set by your requirements for there is no need to set them in simple calls.
| parameter name | value |
| name | 10000 |
| user name | 10000 |
| password | 12345678 |
| hostname or IP Address | 172.16.2.81 |
| port | 5060 |
Step 6. Set Routing Rules in Web
Click “ROUTING—> Call Routing Rules—> New Call Routing Rule” to set outbound and inbound routing rules like the following:
Inbound routing rules:
Outbound routing rules:
Please save all your changes to make effect.
Step 7. Register a SIP extension by software
Taking advantage of SIP software such as Xlite, eyeBeam to register a SIP extension(300). After all above steps, you can try to make calls and send SMS.
Test call:
Incoming call test: Dial the number of port 1 on the gateway via your mobile to see if 300 will ring. If 300 rings, it means your configuration is successful; unless, it means there is something wrong with your configuration, please check it.
Outgoing call test: Dial your mobile number on 300 extension registered in a software phone. If your mobile rings, it means your configuration is ok; unless, please check your configuration.
