Analog Card Software Installation Manual_Rockey
Installation Environment
System:Rockey Linux (Centos 8)
Dahdi-3.2.0
Asterisk-20
1.Hardware Detection
lspci -vvvvvv
Check whether the system recognizes the corresponding board by the output of the above command.
If the A400E is detected, the output will show the word ” Network controller”.
04:00.0 Network controller: Tiger Jet Network Inc. / ICP DAS Tiger3XX Modem/ISDN interface

Subsystem: OpenVox Communication Co.

Control: I/O+ Mem+ BusMaster+ SpecCycle- MemWINV- VGASnoop- ParErr- Stepping- SERR- FastB2B- DisINTx-

Status: Cap+ 66MHz- UDF- FastB2B- ParErr- DEVSEL=medium >TAbort- <TAbort- <MAbort- >SERR- <PERR- INTx-

Latency: 32 (250ns min, 32000ns max)

Interrupt: pin A routed to IRQ 17

Region 0: I/O ports at d000 [size=256]

Region 1: Memory at f7d00000 (32-bit, non-prefetchable) [size=4K]

Capabilities: [40] Power Management version 2

Flags: PMEClk- DSI+ D1- D2+ AuxCurrent=55mA PME(D0+,D1-,D2+,D3hot+,D3cold+)

Status: D0 NoSoftRst- PME-Enable- DSel=0 DScale=0 PME-

Kernel driver in use: wctdm

Kernel modules: wctdm
If any of the A810, A1610 or A2410 is detected, the word ” Communication controller” will be displayed in the output.
Take A810 and A2410 for example
A810 shows the following.
04:00.0 Communication controller: OpenVox Communication Co. Ltd. Device 0810 (rev 15)

Subsystem: OpenVox Communication Co. Ltd. Device 0001

Control: I/O+ Mem+ BusMaster+ SpecCycle- MemWINV- VGASnoop- ParErr- Stepping- SERR- FastB2B- DisINTx-

Status: Cap- 66MHz- UDF- FastB2B- ParErr- DEVSEL=slow >TAbort- <TAbort- <MAbort- >SERR- <PERR- INTx-

Latency: 32, Cache Line Size: 64 bytes

Interrupt: pin A routed to IRQ 17

Region 0: Memory at f7d00000 (32-bit, non-prefetchable) [size=512K]

Kernel driver in use: opvxa24xx

Kernel modules: opvxa24xx

A2410 displays the following.

04:02.0 Communication controller: OpenVox Communication Co. Ltd. device 2410 (rev 15)

Subsystem: OpenVox Communication Co. Ltd. Device 0001

Control: I/O+ Mem+ BusMaster+ SpecCycle- MemWINV- VGASnoop- ParErr- Stepping- SERR- FastB2B- DisINTx-

Status: Cap- 66MHz- UDF- FastB2B- ParErr- DEVSEL=slow >TAbort- <TAbort- <MAbort- >SERR- <PERR- INTx-

Latency: 32, Cache Line Size: 64 bytes

Interrupt: pin C routed to IRQ 18

Region 0: Memory at f7d00000 (32-bit, non-prefetchable) [size=512K]

Kernel driver in use: opvxa24xx

Kernel modules: opvxa24xx
If the system does not detect the card, please turn off the power, clear the slot or insert the card into another slot of the same type and detect it again.
Download DAHDI source package from the official OpenVox website
https://www.openvox.cn/pub/drivers/dahdi-linux-complete/openvox_dahdi-linux-complete-current.tar.gz
Get Asterisk from the Digium website:
https://downloads.asterisk.org/pub/telephony/asterisk/asterisk-20-current.tar.gz
The DAHDI, Asterisk is usually downloaded and extracted by running the following command in the directory /usr/src/.
wget https://www.openvox.cn/pub/drivers/dahdi-linux-complete/openvox_dahdi-linux-complete-current.tar.gz
wget https://downloads.asterisk.org/pub/telephony/asterisk/asterisk-20-current.tar.gz
tar -xvzf openvox_dahdi-linux-complete-current.tar.gz
tar -xvzf asterisk-20-current.tar.gz
Install
Dependency package installation
Before installing DAHDI, please check if all the dependencies are installed successfully, if the dependencies are not installed, the subsequent software installation will not proceed smoothly.
dnf -y install epel-release
dnf group -y install "Development Tools"
dnf -y install git wget vim net-tools sqlite-devel psmisc bison ncurses ncurses-devel libtermcap-devel newt-devel libxml2-devel libtiff-devel gtk2-devel libtool libuuid-devel subversion initscripts kernel-devel kernel-devel-$(uname -r) crontabs cronie-anacron libedit libedit-devel zlib zlib-devel openssl openssl-devel gnutls-devel gcc gcc-c++
If the matching kernel-devel is not found in the update source, then you will need to download the matching RPM package and install it manually, or upgrade to the latest stable kernel version by doing the following
yum install kernel kernel-devel
After installation, reboot the system to apply the new kernel and continue with the rest of the operations on the new kernel.
During the above dependency package detection process, if the dependency package is already installed, the system will indicate that it is installed and will not continue installing this package, and the user can run the next command to install other packages.
If it is not installed, it will be installed automatically until the system prompts for a successful installation.
Dahdi Installation
Convert the path to the dahdi-linux-complete-XX source package directory (XX stands for DAHDI version) and run the following command to install DAHDI.
cd /usr/src/dahdi-linux-complete-XX
make
make install
make config
systemctl enable dahdi
Asterisk installation
Convert the path to the asterisk source package directory (XX stands for asterisk version) and run the following command to install asterisk.
cd asterisk-20.xx
contrib/scripts/install_prereq install
. /configure --libdir=/usr/lib64 --with-jansson-bundled=yes
make
make install
make samples
ystemctl enable asterisk
2.Configure
Load the driver
After compiling, please run the following command to load the driver according to the corresponding board model: # modprobe dahdi
# modprobe dahdi
If it is an A400 card, please load the following command
# modprobe wctdm opermode=CHINA
If it is an A810/A1610/A2410 card, please load the following command
# modprobe opvxa24xx opermode=CHINA
Then continue to execute the following command to generate the corresponding channel configuration file
# dahdi_genconf -vvv
The “opermode” only applies to FXO ports, i.e. it does not work for FXS. Users can also replace “CHINA” with another country standard, please check the file . /dahdi-linux-XX/linux/drivers/dahdi/fxo_modules.h to get other communication standards.
Under normal circumstances, after executing the command “dahdi_genconf”, the system will automatically generate the files /etc/dahdi/system.conf and etc/asterisk/dahdi-channels.conf. Check if the generated configuration files meet your requirements, or you can modify the relevant parameters manually. It is important to make sure that dahdi-channels.conf is included in chan_dahdi.conf, if not, please run the command:
# echo “#include dahdi-channels.conf” >> /etc/asterisk/chan_dahdi.conf
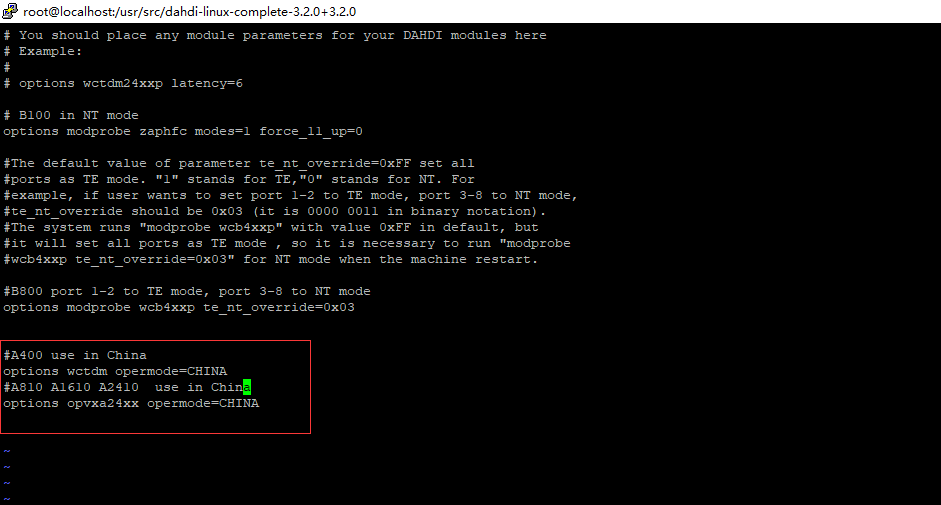
Edit /etc/modprobe.d/dahdi.conf to automatically load opermode parameters on boot

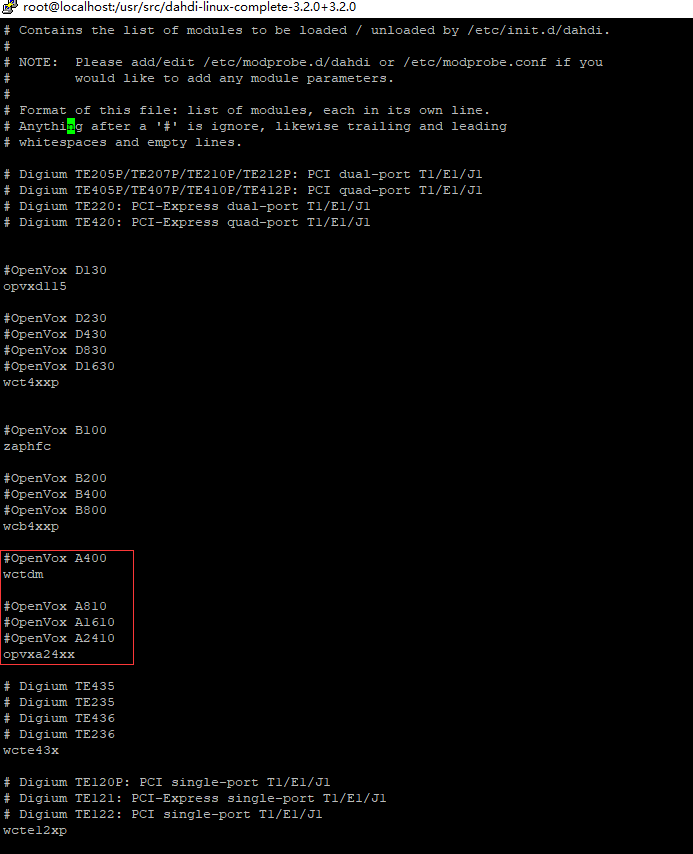
Add the corresponding board driver to /etc/dahdi/modules file to automatically load the board driver on boot
#vi /etc/dahdi/modules

The following A400 board is used as an example to configure
The FXO port uses fxsks signaling, while the FXS port uses fxoks signaling.
In this example, ports 1 and 2 of the A400 are fxs modules, and ports 3 and 4 are fxo modules
The following shows part of the basic channel configuration file /etc/dahdi/system.conf.

Modifying the country standard In order to match the country communication standard, some parameters need to be modified. For example, in China, please modify the parameters loadzone and defaultzone as shown below:
loadzone = cn
defaultzone = cn
The user can find the country parameters in the file . /dahdi-XX/tools/zonedata.c. There is also another parameter in /etc/asterisk/indications.conf that needs to be changed.
country=cn
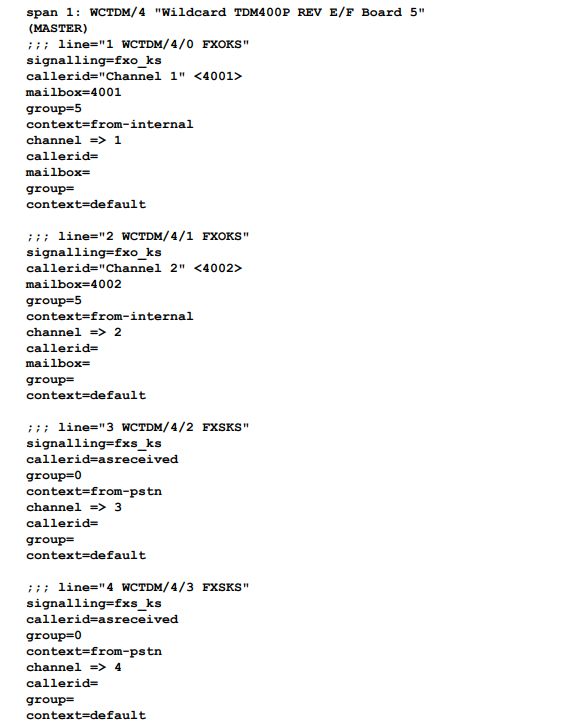
A part of the file /etc/asterisk/dahdi-channels.conf is shown in the figure.

After confirming the system.conf and dahdi-channels.conf files, execute the following command:
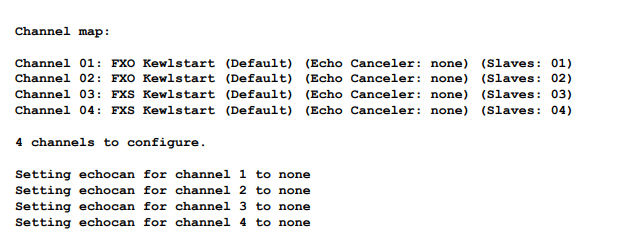
# dahdi_cfg -vvvvvv
This command will read from the file system.conf and load the parameters into the hardware. A portion of the output of the command run is shown below.

3.Start Asterisk
# asterisk -vvvvvvgc
If Asterisk is already running, run “asterisk -r” instead. In the CLI interface, run.

If all channels are displayed correctly, DAHDI has been successfully loaded into Asterisk, so please set up the dial plan next.
4.Writing the dial plan
Please write the dial plan in the extensions.conf file. The following figure shows a simple inbound and outbound plan.
# vim /etc/asterisk/extensions.conf
In this example, analog cards 1 and 2 are fxs ports connected to analog phones, ports 3 and 4 are fxo ports connected to pstn line, when a call comes in from pstn line, the analog phone connected to dahdi/1 (the first port of the board) rings.
[from-pstn]
exten => s,1,Answer()
exten => s,n,Dial(dahdi/1,,r)
exten => s,n,Hangup()
When the analog phone calls out, it goes out through dahdi/3 (the third port of the board).
[from-internal]
exten => _X.,1,Dial(dahdi/3/${EXTEN})
exten => _X.,2,Hangup()
After setting up the dialplan, please run “asterisk -r”, and execute the command “dialplan reload” in the CLI interface, and you will be able to dial.
