This document describes the detailed steps for interfacing the service board to the FreeSwitch.
Two-way calls between the phone and the gateway can be made by following the configuration steps below.
•Outbound: from FreeSwitch SIP extension 1000 to the gateway via trunk 1008.
•Inbound: calls from outside lines to the gateway, via SIP 1020 to the FreeSwitch, and then through the FreeSwitch to the 1000 SIP extensions.

In the following steps, the parameters in the table are required configurations, other parameters can be configured according to your needs.
Step 1: Create a sip relay in FreeSwitch
Enter the default configuration directory for FreeSWITCH and add the gateway configuration in /etc/freeswitch/directory/default/1008.xml:
vi /etc/freeswitch/directory/default/1008.xml
<include>
<user id="1008">
<params>
<param name="password" value="1008"/>
<param name="vm-password" value="1008"/>
</params>
<variables>
<variable name="toll_allow" value="domestic,international,local"/>
<variable name="accountcode" value="1008"/>
<variable name="user_context" value="default"/>
<variable name="effective_caller_id_name" value="Extension 1008"/>
<variable name="effective_caller_id_number" value="1008"/>
<variable name="outbound_caller_id_name" value="$${outbound_caller_name}"/>
<variable name="outbound_caller_id_number" value="$${outbound_caller_id}"/>
<variable name="callgroup" value="techsupport"/>
</variables>
</user>
</include>
Parameter Name |
Value |
user id |
1008 |
password |
1008 |
effective_caller_id_name |
Extension 1008 |
effective_caller_id_number |
1008 |
Note: The above configuration is the default configuration, no need to modify
Step 2: Create sip extensions on FreeSwitch (1000)
<include>
<user id="1000">
<params>
<param name="password" value="1000"/>
<param name="vm-password" value="1000"/>
</params>
<variables>
<variable name="toll_allow" value="domestic,international,local"/>
<variable name="accountcode" value="1000"/>
<variable name="user_context" value="default"/>
<variable name="effective_caller_id_name" value="Extension 1000"/>
<variable name="effective_caller_id_number" value="1000"/>
<variable name="outbound_caller_id_name" value="$${outbound_caller_name}"/>
<variable name="outbound_caller_id_number" value="$${outbound_caller_id}"/>
<variable name="callgroup" value="techsupport"/>
</variables>
</user>
</include>
Parameter Name |
Value |
user id |
1000 |
password |
1000 |
Step 2: Create sip extensions on FreeSwitch (1000)
Step 3: Add Inbound and Outbound Routing Rules in the FreeSwitch
Inbound Routing Rules:
Edit Inbound Routing Rules file /etc/freeswitch/dialplan/public/00_inbound_did.xml
<include>
<extension name="public_did">
<condition field="destination_number" expression="1020">
<!--
If you're hosting multiple domains you will want to set the
target_domain on these calls so they hit the proper domain after you
transfer the caller into the default context.
$${domain} is the default domain set from vars.xml but you can set it
to any domain you have setup in your user directory.
-->
<action application="set" data="domain_name=$${domain}"/>
<!-- This example maps the DID 5551212 to ring 1000 in the default context -->
<action application="transfer" data="1000 XML default"/>
</condition>
</extension>
</include>
Parameter Name |
Value |
destination_number |
1020 |
data |
1000 XML default |
Outbound Routing Rules:
Edit Outbound Routing Rules file /etc/freeswitch/dialplan/default.xml
<extension name="outbound">
<condition field="destination_number" expression="^9(\d+)$">
<action application="answer"/>
<action application="set" data="ringback=${us-ring}"/>
<action application="bridge" data="sofia/internal/[email protected]"/>
</condition>
</extension>
Parameter Name |
Value |
Outbound routing rulesName |
outbound |
expression |
^9(\d+)$, numbers starting with 9 will match this route |
data |
sofia/internal/[email protected] |
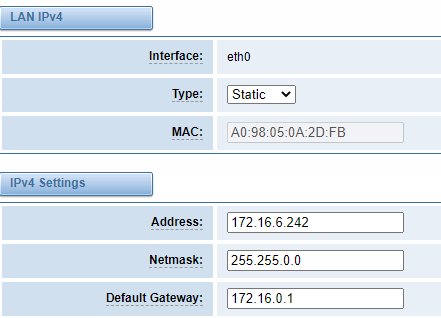
Step 4: Set network parameters in Web
Login to the network in your browser, and click "Network->LAN Settings" to set your network parameters.
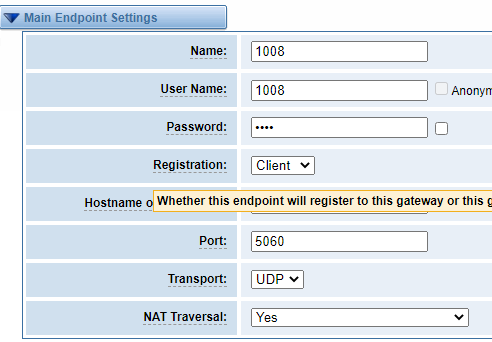
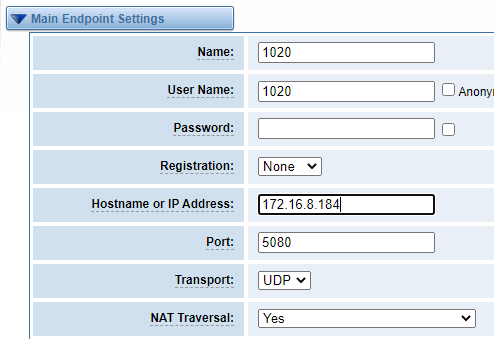
Step 5: Create SIP trunk 1008 and unauthenticated 1020 endpoints in the Web
Please select "VOIP-> VOIP Settings->Add New SIP Terminal" to set up SIP trunk. The following figure shows the detailed information about how to set it up.
For other parameters in SIP, please set them according to your requirements, as they do not need to be set in simple calls.
Parameter Name |
Value |
Trunk Name |
1008 |
Name |
1008 |
Password |
1008 |
Registration Type |
Client |
IP |
172.16.80.43 |
Port |
5060 |
Transmission Protocol |
UDP |
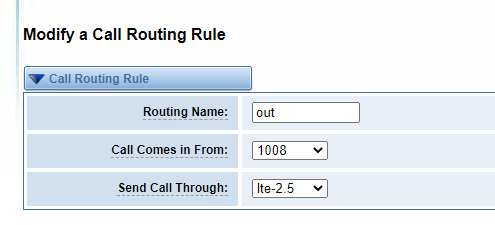
Step 6: Set up routing rules in the Web
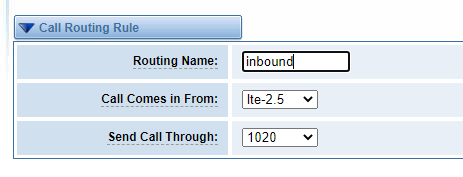
Click Routing->Call Routing Rules->New Call Routing Rules to set up outbound and inbound routing rules, as follows.
Outbound routing rules:
Parameter Name |
Value |
Name |
outbound |
Call from |
1008 |
Call To |
Lte-2.5 |

Inbound routing rules:
Parameter Name |
Value |
Name |
inound |
Call from |
Lte-2.5 |
Call To |
1020 |
Please save and apply all settings.
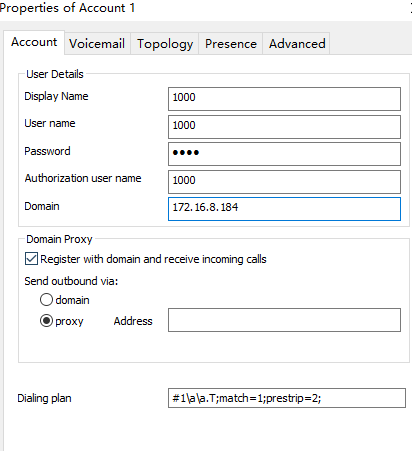
Step 7: Register an extension with a softphone (1000)
The SIP extension (1000) can be registered using SIP software such as Xlite, eyeBeam, microsip, etc. The following figure shows an example of Xlite configuration 1000.
Test calls.
Inbound test: Call the number of Port2.5 on the gateway with your cell phone and see if the 1000 rings, ringing means the configuration is successful; if it does not ring, please check the configuration
Outbound test: call your own cell phone number in the registered 1000 softphone, if your phone rings, it means the configuration is successful; if it does not ring, it means the configuration failed, please check the configuration
Parent topic: WTU