ACU Audio Module User Manual
Profile version: R1.1.0
Product Version:R1.1.0
Statement:
This manual is intended only as an operating guide for users.
No unit or individual may reproduce or excerpt part or all of the contents of this manual without the written permission of the Company, and may not distribute it in any form.
1 Device Panel Introduction
1.1 Schematic diagram of the chassis
ACU module for chassis UCP1600/2120/4131 series

Figure 1-1-1 frontal diagram
1.2 Board schematic

Figure 1-2-1 ACU board schematic
As shown in Figure 1-1-1, the meaning of each logo is as follows
- Indicator lights: There are 3 indicators from left to right: fault light E, power light P, run light R; power light is always green after normal operation of the device, the run light is green flashing, the fault light remains temporarily useless.
- reset key: long press for more than 10 seconds to restore the temporary IP address 10.20.30.1, restore the original IP after power failure and reboot.
- V1 is the first audio, red is OUT is the audio output, white is IN is the audio input. v2 is the second.
2 Login
Login to the gateway web page: Open IE and enter http://IP, (IP is the wireless gateway device address, default 10.20.40.40), enter the login screen shown below. Initial user name: admin, password: 1
Figure 2-1-1 Audio Gateway Module Login Interface

3 Network information configuration
3.1 Modify static IP
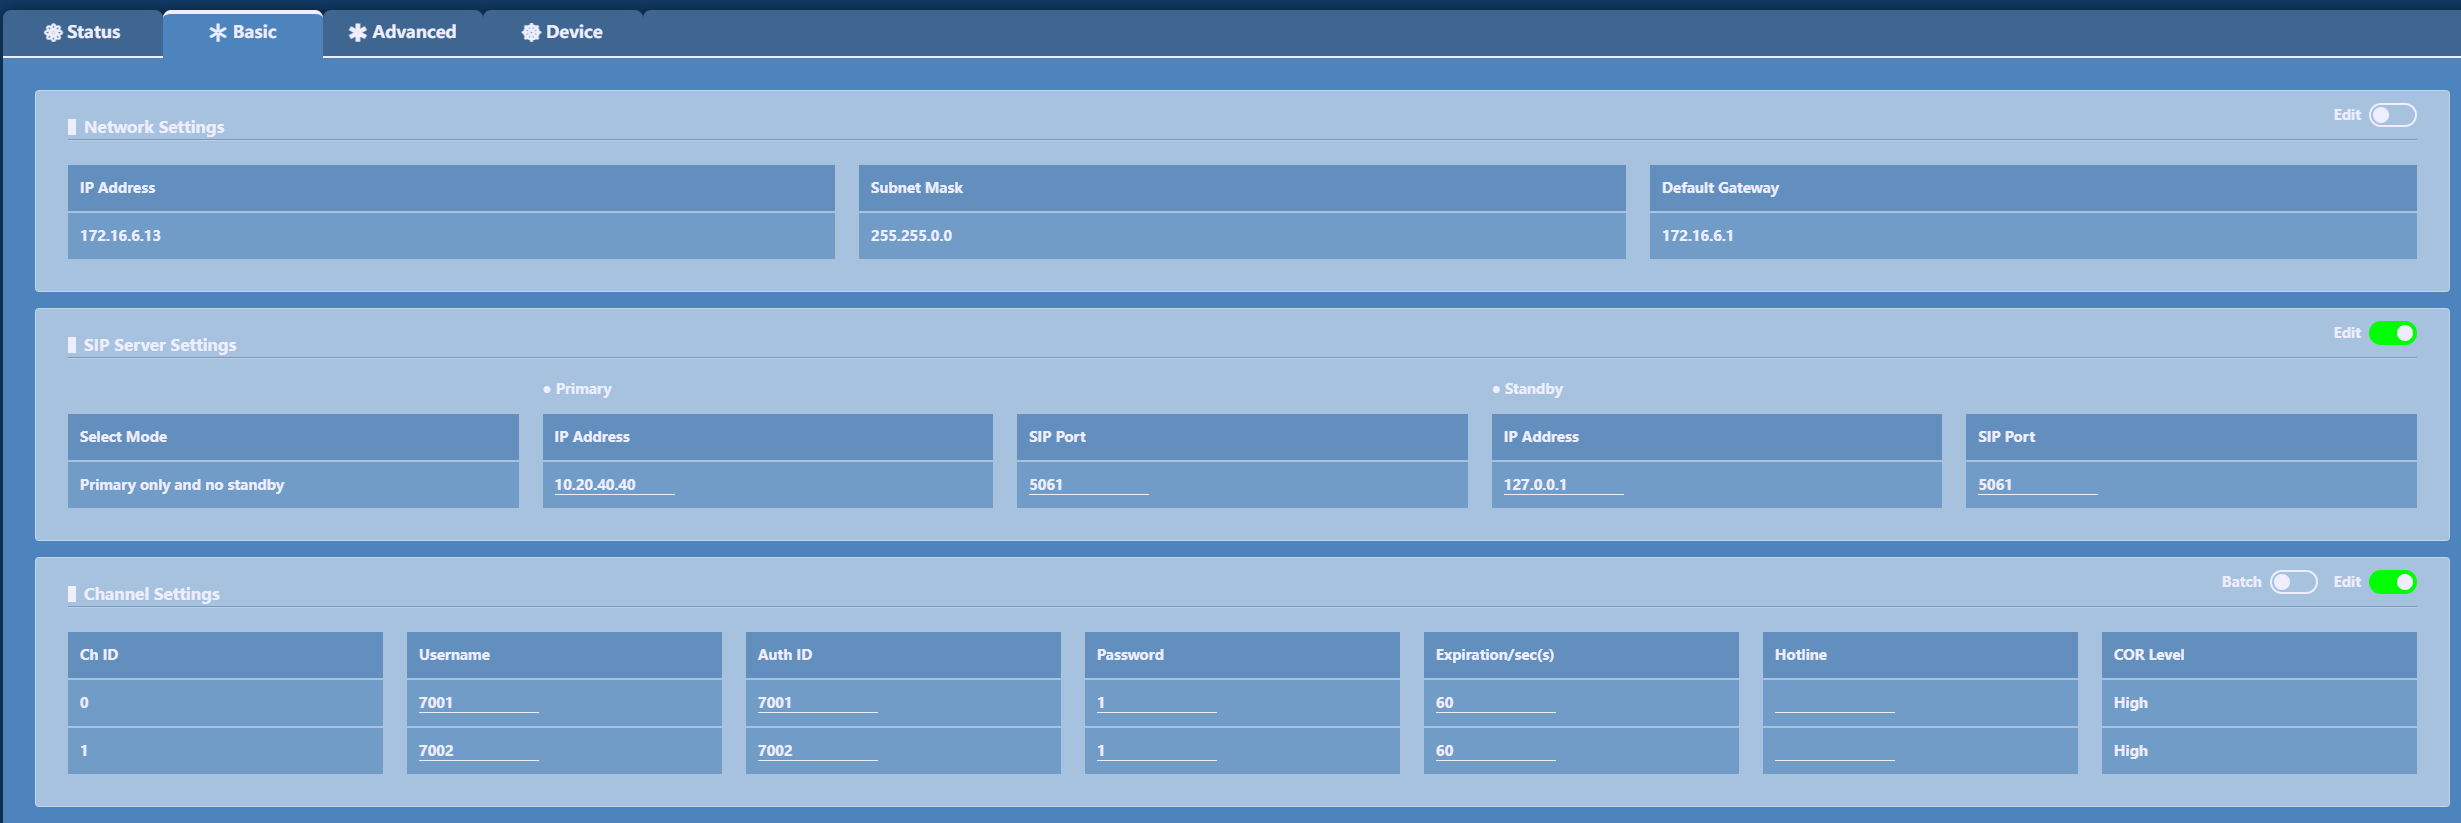
The static network address of the audio gateway can be modified in [Basic/Network Settings], as shown in Figure 3-1-1.

Figure 3-1-1
![]() Description
Description
At present, the gateway IP acquisition method only supports static, after modifying the network address information, you need to reboot the device to take effect.
3.2 Registration server configuration
In [Basic/SIP Server Settings], you can set the IP addresses of the primary and backup servers for the registration service, and the primary and backup registration methods, as shown in Figure 3-2-1:

Figure 3-2-1
The primary and backup registration methods are divided into: no primary and backup switching, registration priority to the primary softswitch, and registration priority to the current softswitch. The order of registration: primary softswitch, backup softswitch.
![]() Description
Description
No primary/backup switching: Only to the primary softswitch.
Registration to the primary softswitch takes priority: the primary softswitch registration fails to register to the standby softswitch. When the primary softswitch is restored, the next registration cycle registers with the primary softswitch.
Registration priority to the current softswitch: registration failure to the primary softswitch registers to the backup softswitch. When the primary softswitch is restored, it always registers with the current softswitch and does not register with the primary softswitch.
3.3 Adding user numbers
The user number of the audio gateway can be added in [Basic/Channel Settings], as shown in Figure: 3-3-1:

Figure 3-3-1
Channel number: for 0, 1
User number: the phone number corresponding to this line.
Registration user name, registration password, registration period: the account number, password and interval time of each registration used when registering to the platform.
Hotline number: the called phone number corresponding to the hotline function key, triggered according to COR carrier polarity, configured low valid then triggered when the external input is high, and vice versa. The default hover must be configured low valid.
![]() Description
Description
- Time to initiate registration = Registration period * 0.85
- The gateway uses only two channels and can only add two users
When adding a number, you can configure the media, gain, and PSTN configuration.
3.4 Media Configuration
When adding a gateway user, you can select the voice encoding method for the user under [Advanced/User Information/Media settings], which pops up as shown in Figure 3-4-1:

Figure 3-4-1
Speech encoding format: including G711a, G711u.
3.5 Gain configuration
In [Advanced/Gain Configuration], you can configure the gain type of the user, as shown in Figure 3-5-1:

Figure 3-5-1
- DSP_D->A gain: the gain from the digital side to the analog side, five levels is the maximum.
3.6 Basic Configuration
In [Basic Configuration], as shown in Figure 3-6-1:

4 Status queries
4.1 Registration Status
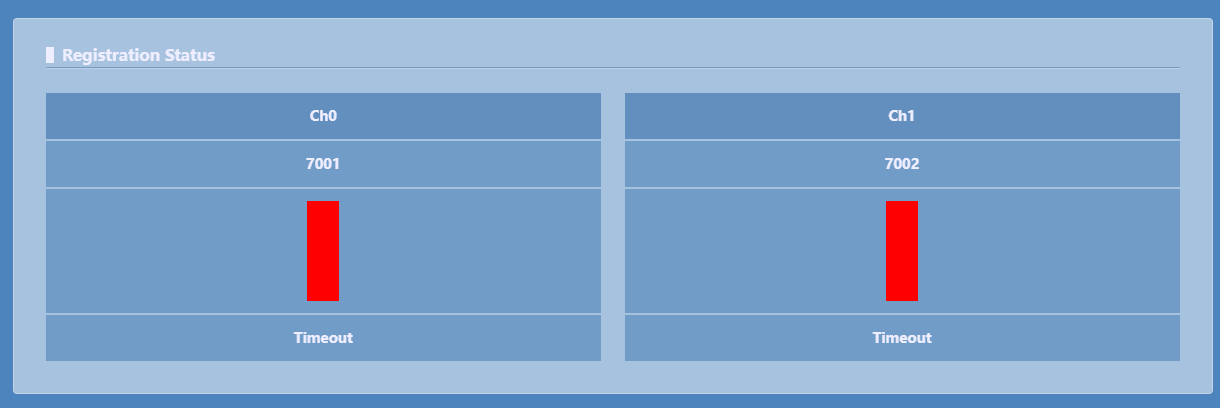
In [Status /Registration Status], you can view the user registration status information, as shown in Figure 4-1-1:

Figure 4-1-1
4.2 Line Status
In [Status /Line Status], line status information can be viewed as shown in Figure 4-2-1:

Figure 4-2-1
5 Equipment Management
5.1 Account Management
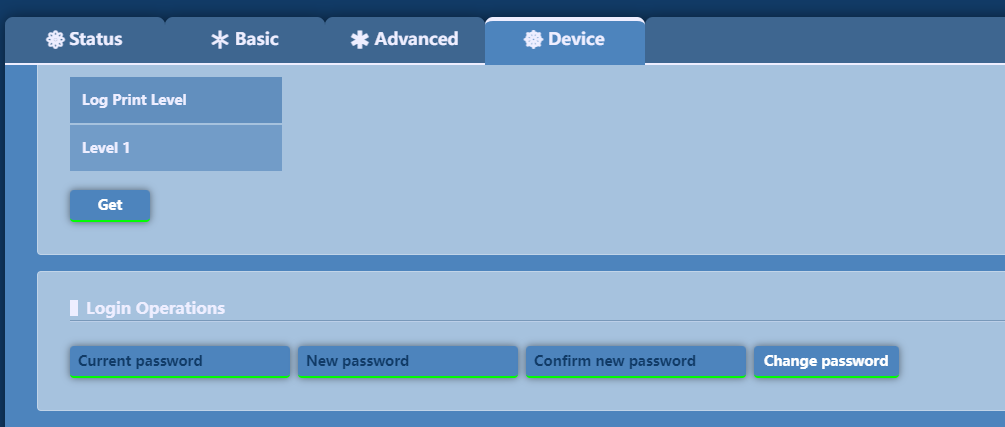
The password for web login can be changed in [Device /Login Operations], as shown in Figure 5-1-1:

Figure 5-1-1
Change password: Fill in the current password in the old password, fill in the new password and confirm the new password with the same modified password, and click the <Modify Password> button to complete the password change.
5.2 Equipment Operation
In [Device /Device Operation], you can perform the following operations on the gateway system: recovery and reboot, as shown in Figure 5-2-1, where:
 Figure 5-2-1
Restore factory settings: Click the <Restore> button to restore the gateway configuration to factory settings, but will not affect the system IP address-related information.
Reboot the device: Clicking the <Reboot> button will perform a gateway reboot operation on the device.
5.3 Version information
The version numbers of gateway-related programs and library files can be viewed in [Device/Version Information], as shown in Figure 5-3-1:

Figure 5-3-1
5.4 Log Management
The log path, log level, etc. can be set in [Device /Log Management], as shown in Figure 5-4-1, where:

Figure 5-4-1
Current log: You can download the current log.
Backup log: You can download the backup log.
Log path: the path where the logs are stored.
Log level: The higher the level, the more detailed the logs are.
5.5 Software Upgrade
The gateway system can be upgraded in [Device /Software Upgrade], as shown in Figure 5-5-1:

Figure 5-5-1
Click <Select File>, select the upgrade program of the gateway in the pop-up window, select it and click <Open>, then finally click <Upgrade> button on the web page. The system will automatically load the upgrade package, and will reboot automatically after the upgrade is completed.

