New version of analog gateway OIAD connect to FreePBX
iAG series analogue gateway connect to FreePBX
Foreword
This document describes the basic configuration of FreePBX to interface with the analogue gateway iAG. In this document, we use the iAG800 as an example. The following steps can also be used with other models of iAG. It is generally applicable to scenarios where the user has remote extensions on the iAG800 and an external PSTN trunk.
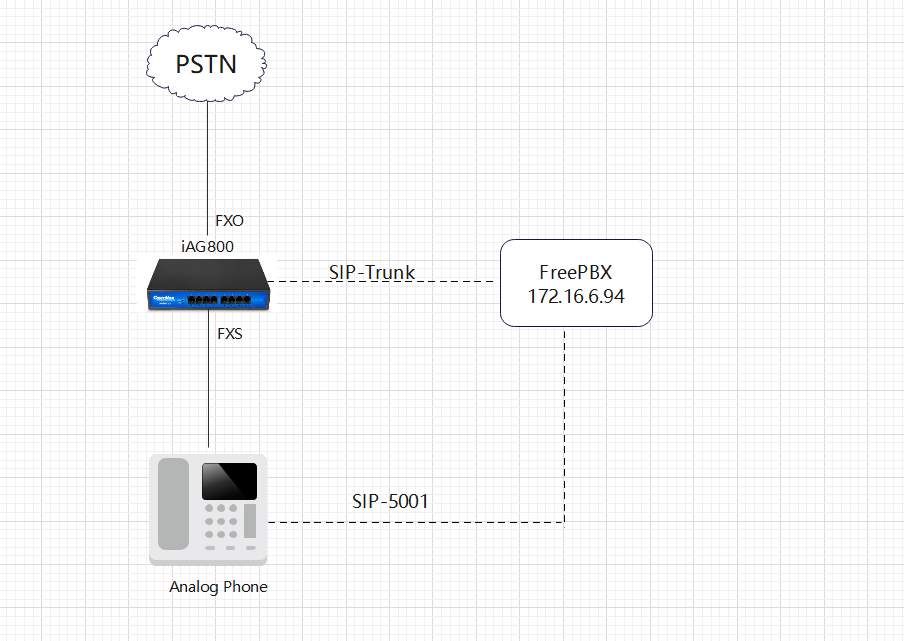
There are two ways to interface the iAG800 with FreePBX.
Method 1: Use IP authentication to interface with FreePBX
Method 2: Register iAG800 to FreePBX
Method 1: Use IP authentication to interface with FreePBX
Step 1: Configure the FXO port of the iAG800
Connect the PSTN line to the first FXO port of the iAG800.
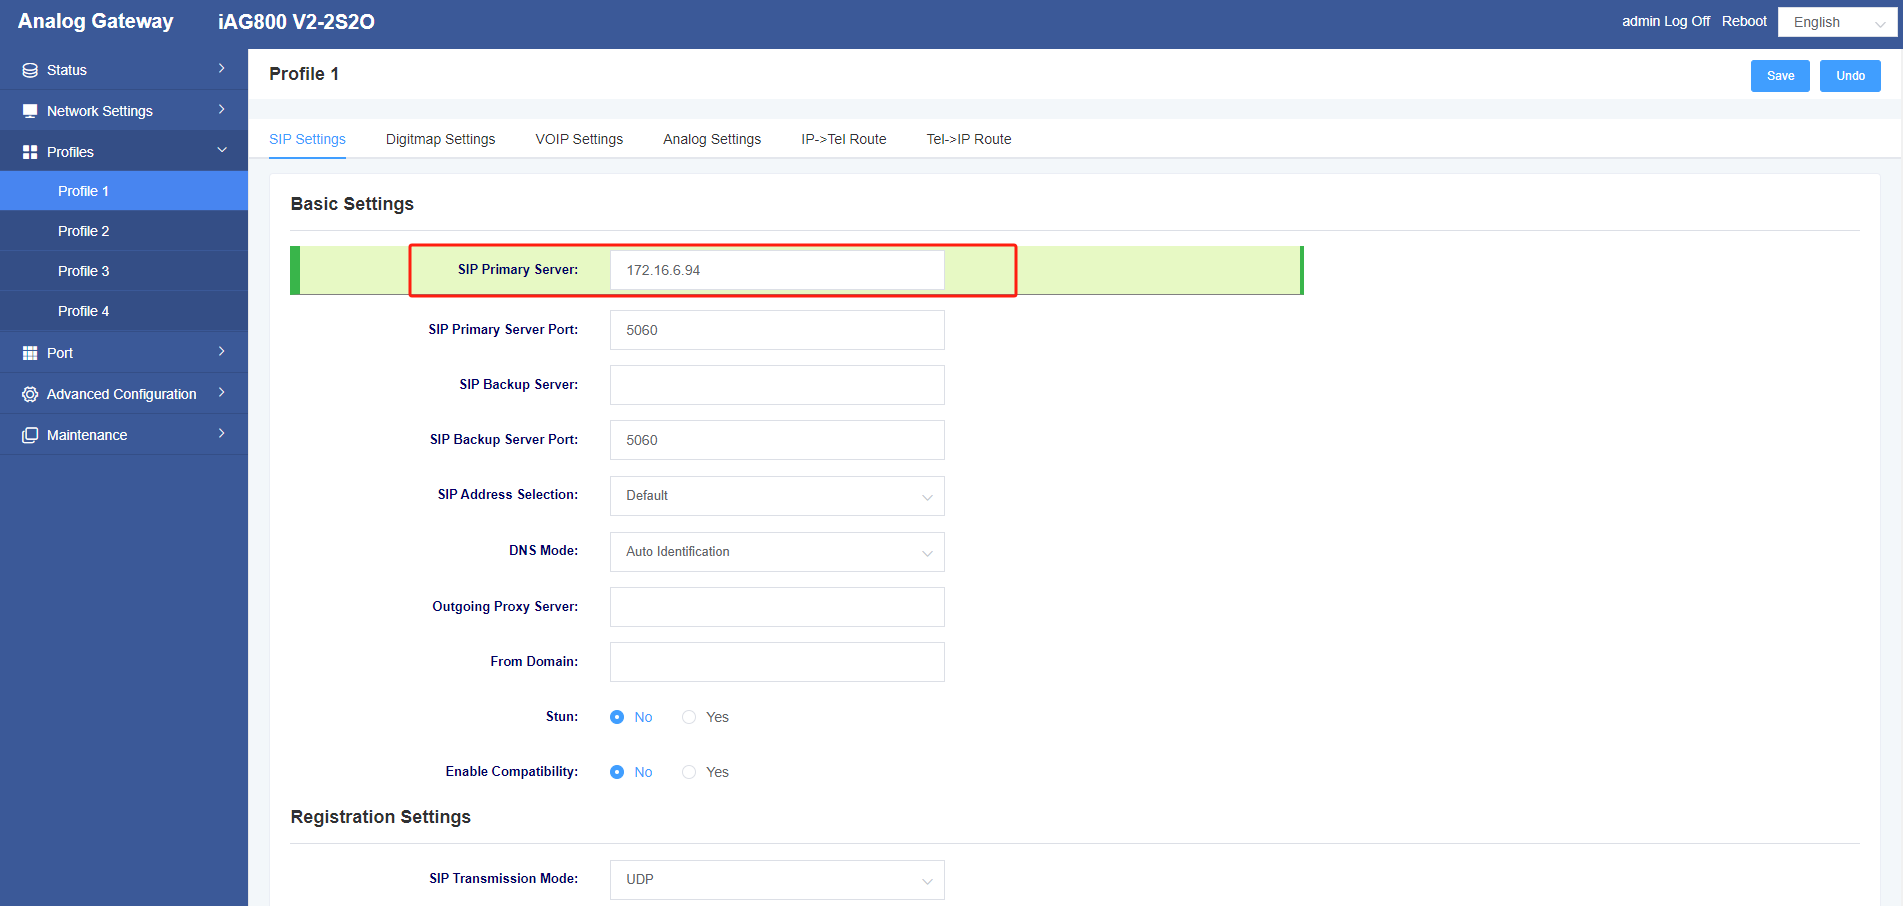
You need to use a Profile when configuring the FXO port, so set up the Profile first. On the iAG800 web interface, set up the Profile under Profiles -> Profile 1. In this document, the IP address of the FreePBX is 172.16.6.94, so fill in the IP address of the FreePBX in the SIP Primary server of Profile 1.
Add FXO port in Port->FXO Port Settings, the Profiles is the Profile 1 which is just set up, the Group ID is any one of 4-64, Enable Port ticks Yes, the policy selects Cyclic Increase, the SIP User ID is the Trunk Name, Enable Registration ticks No, the Inbound Identity By IP:Port is filled in with the IP address of FreePBX, the TEL2IP Called Mode selects Custom. TEL2IP Custom Called is filled in 12345.
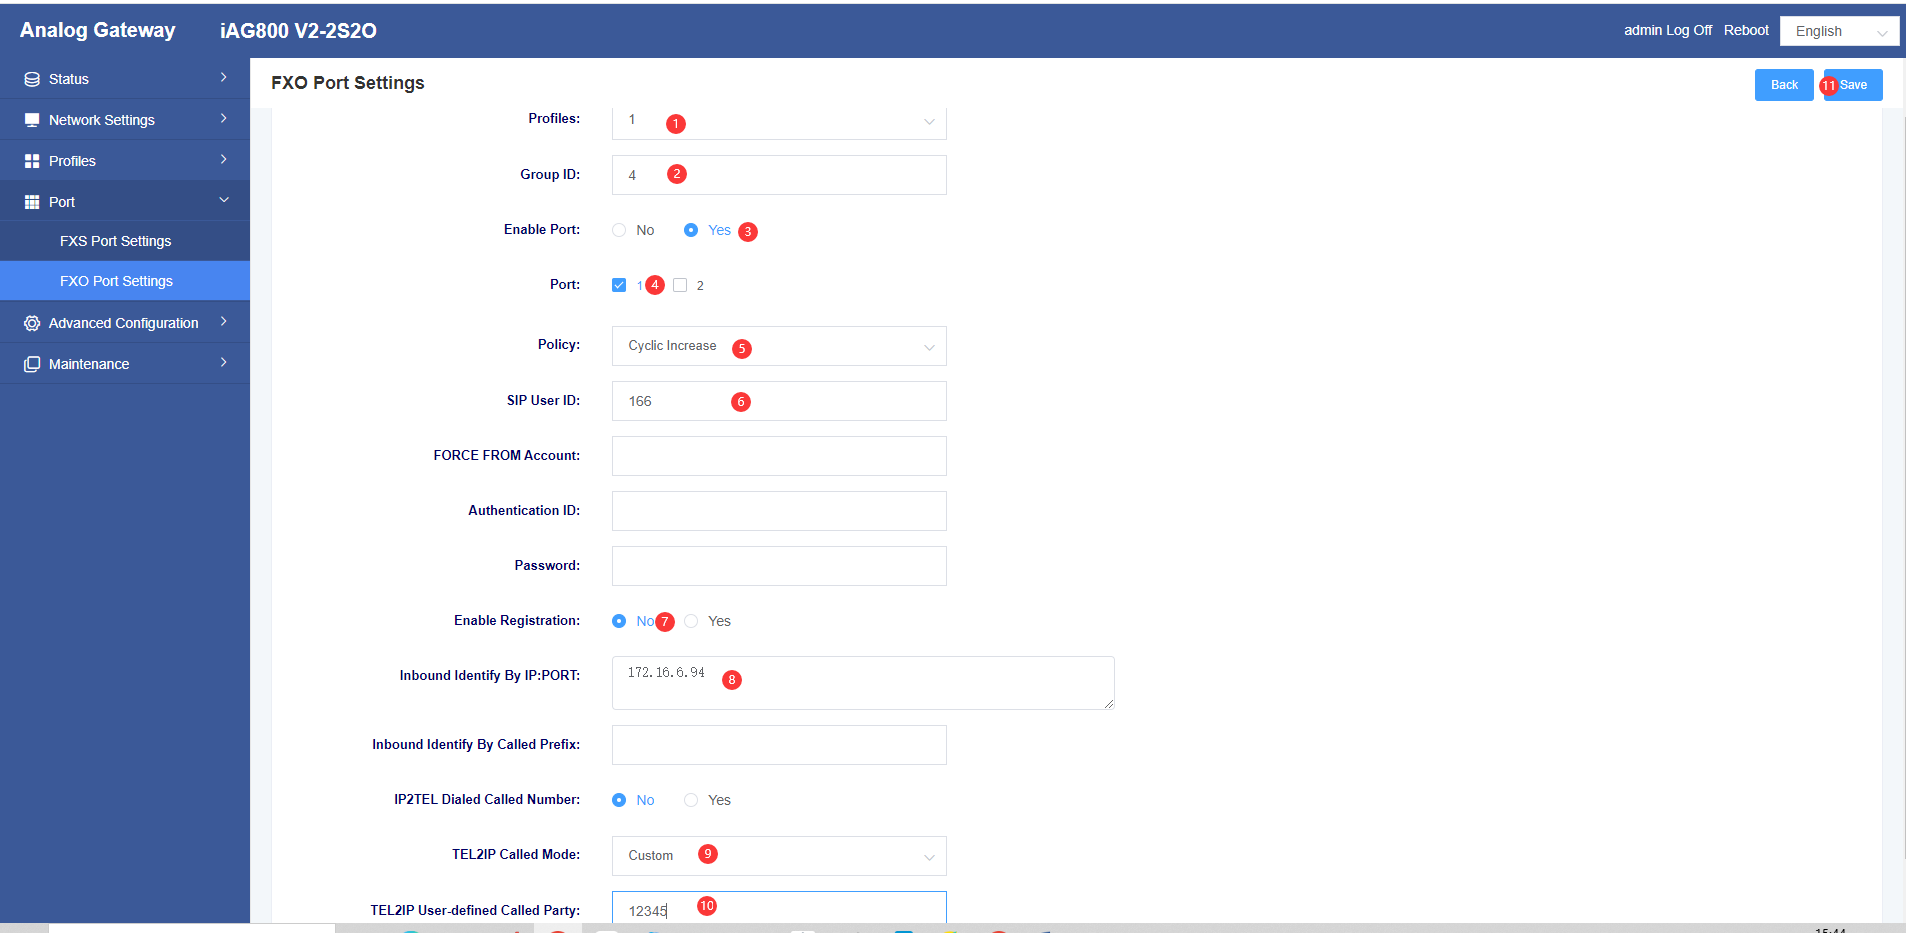
After clicking Save, keep an eye on the generated SIP signaling port, here the number generated is 30004.

Step 2: Configure the FXS port of the iAG800
Connect an analogue handset to the first FXS port of the iAG800.
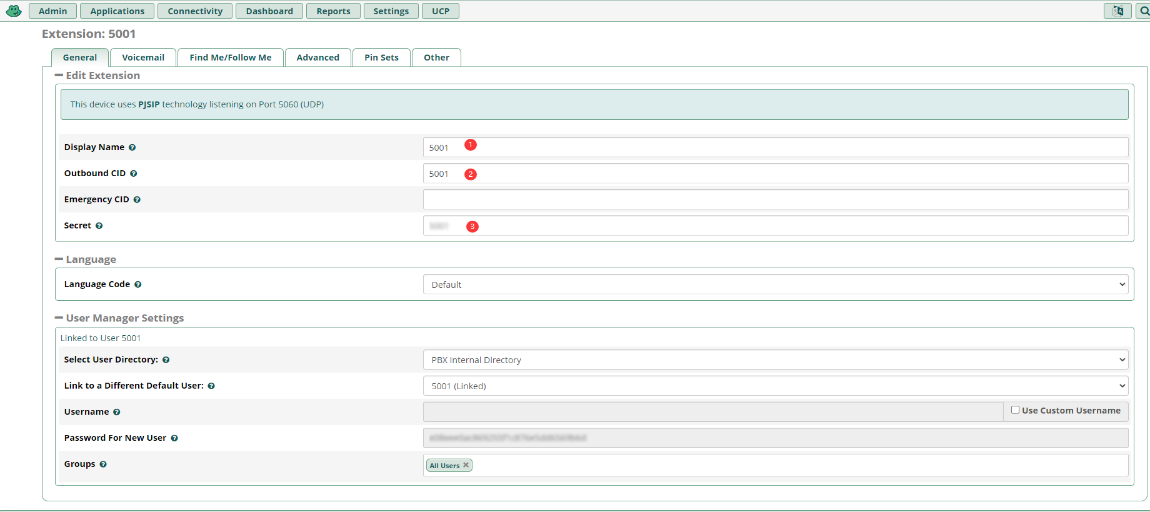
Add SIP extension information in Port->FXS Port Settings, here a SIP extension 5001 on FreePBX is registered.

The following figure shows the information for extension 5001 on the FreePBX.
Step 3: Configure Point-to-Point SIP Trunk on the FreePBX
In FreePBX web, in Connectivity->Trunks, click Add SIP(chan_pjsip) Trunk in Add Trunk option column. In this document, the IP address of iAG800 is 172.16.6.79. In the General interface, enter 166 as the trunk name, check No for Disable Trunk, and leave the rest of the configuration as default. 
In the pjsip setup interface, check None for Authentication, select None for Registration, the SIP server is the ip address 172.16.6.79 of iAG800, and the SIP Sever Port is 30004.
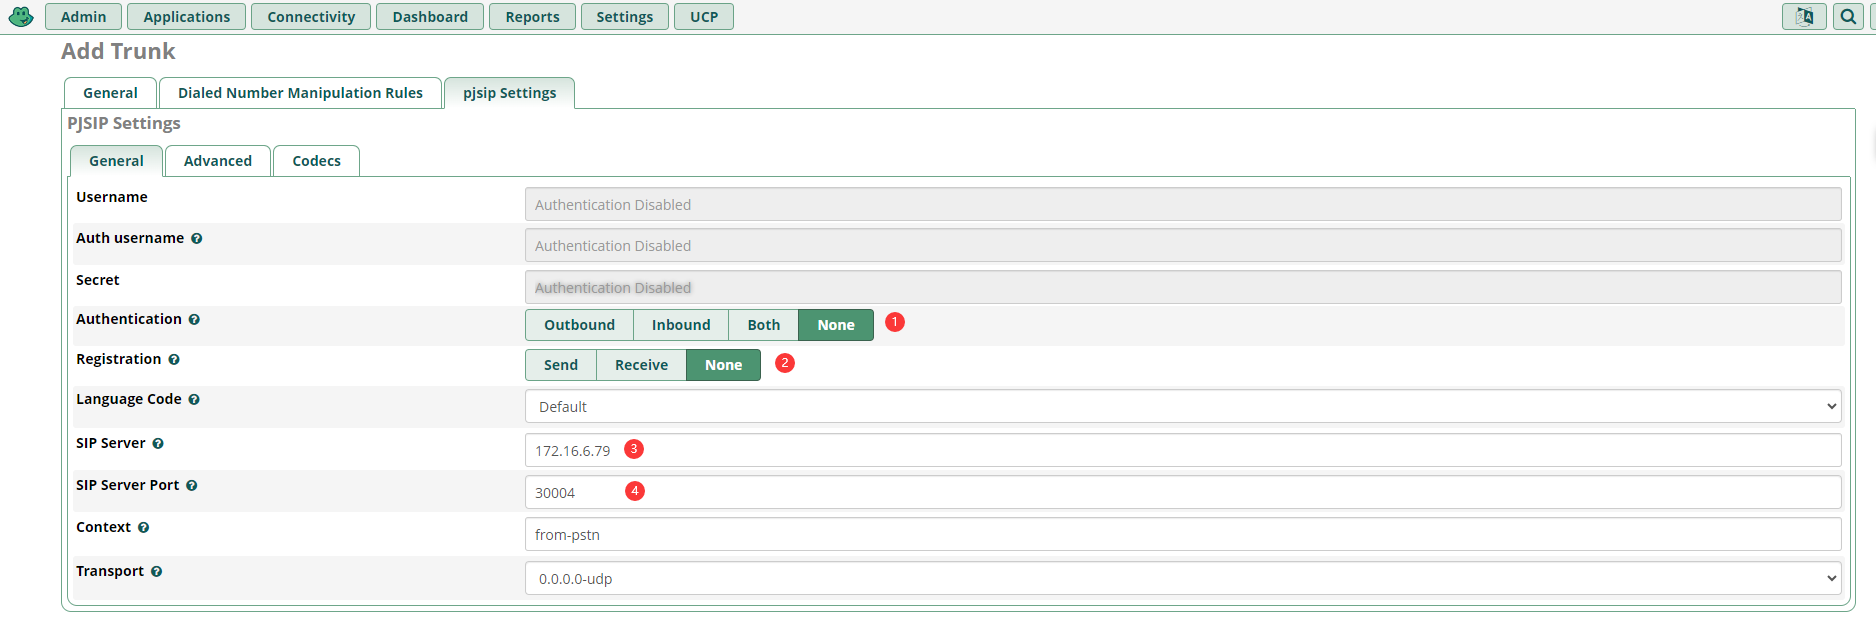
Fill in the fields and click Submit, then click Apply Config to make the settings take effect.

Step 4: Set up Outbound Routes on the FreePBX
On the web of FreePBX, click Add Outbound Route in Connectivity->Outbound Routes, fill in 0166 as the Route name in Route Setting Interface, add the SIP trunks just configured by Trunk Sequence for Matched Routes, and configure the rest by default. The extensions on FreePBX can be sent to the numbers in PSTN network through the just configured SIP trunk.
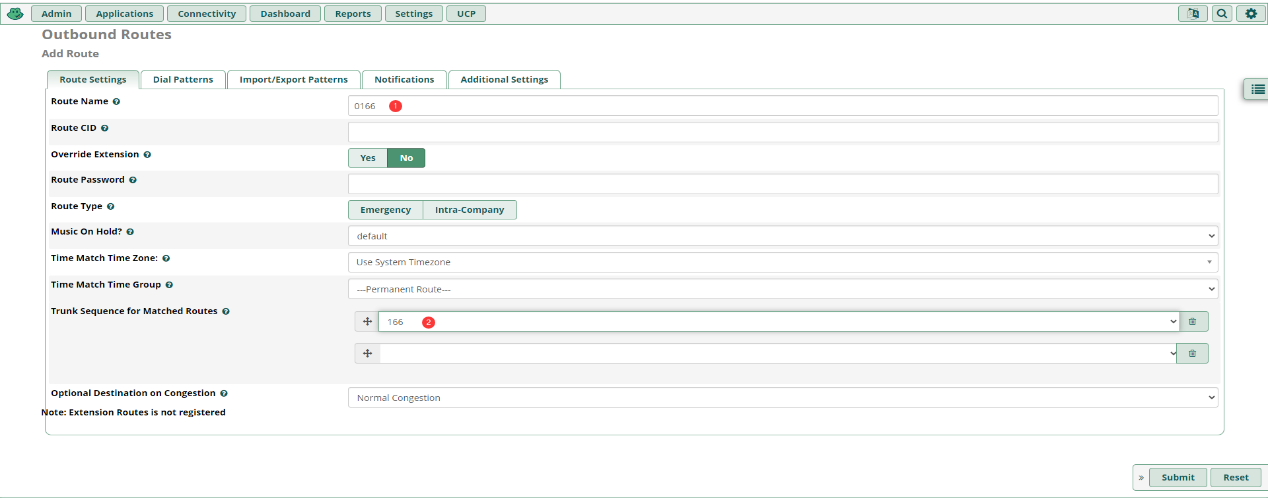
Configure the dialing pattern in the Dial Patterns screen with 0 for the prefix and X. for the match pattern, X. being any number.

Step 5: Configure Inbound Routing in FreePBX
On the FreePBX web, under Connectivity -> Inbound Route click Add Inbound Route. In this example, the description is filled with test, the DID number is set to 12345, and the Set Destination is set to select Extension->5001.

Step 6: Special note
If you want to call an extension directly, you only need to change the TEL2IP called number in the FXO port settings on the web of iAG800, for example, change 12345 in the red box to 5001. 5001 is a SIP extension on FreePBX.
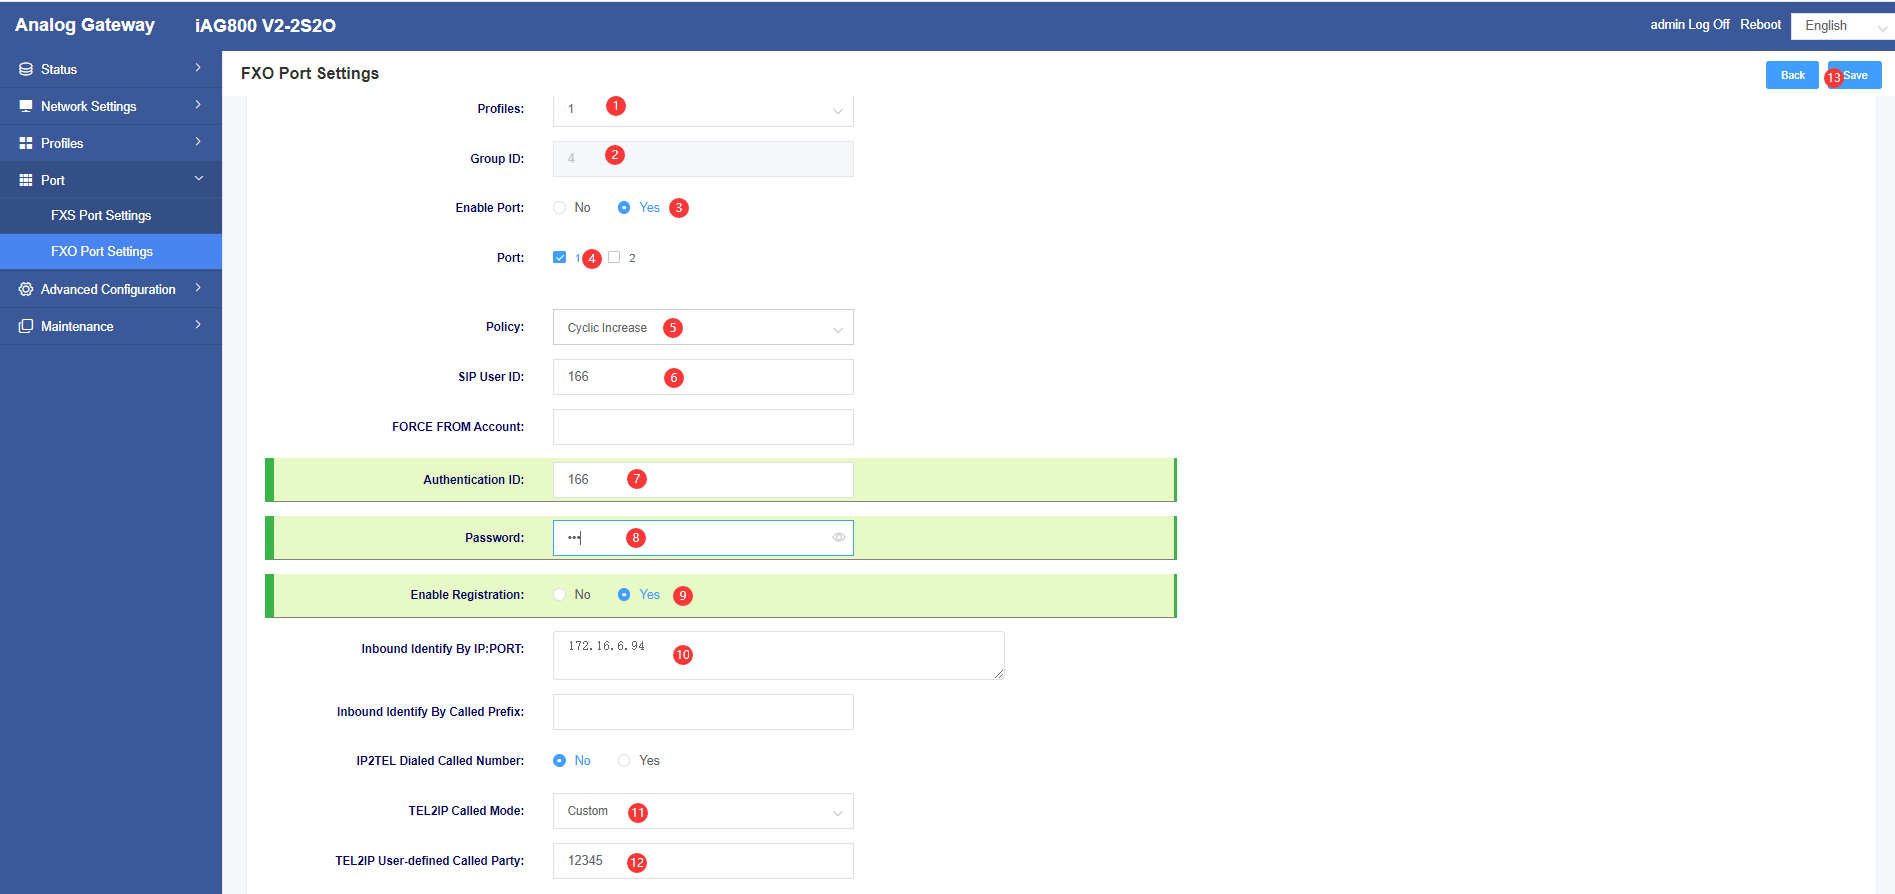
Method 2: Register iAG800 to FreePBX
Only the configurations with differences are shown below, for the rest of the configurations, please refer to Method 1.
Step 1: Configure SIP trunks in server mode on FreePBX
On the FreePBX web, under Connectivity->Trunks, click Add Trunk in the Add Trunk option column to add a SIP (chan_pjsip)trunk.General interface configuration is shown in Method 1, in the pjsip setting interface, fill in 166 for secret, select Inbound for authentication, select Receive for registration, and the authentication name is defaulted as The authentication name is defaulted to the relay name. 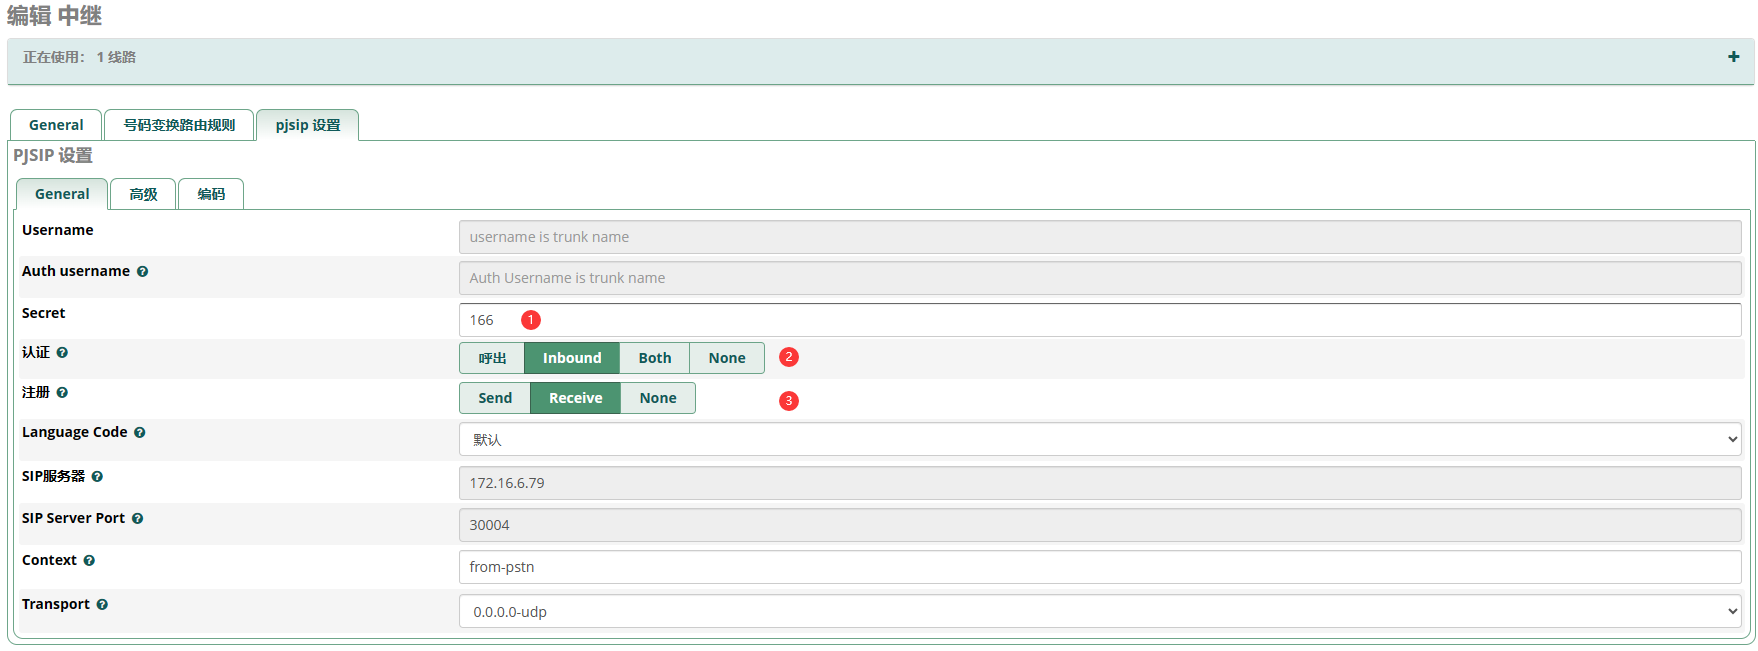
Step 2: Configure FXO port settings on the iAG800
In this example, the SIP User ID is the trunk name, the Enable Registration tick is Yes, and the Authentication ID and Password are both 166 set above.
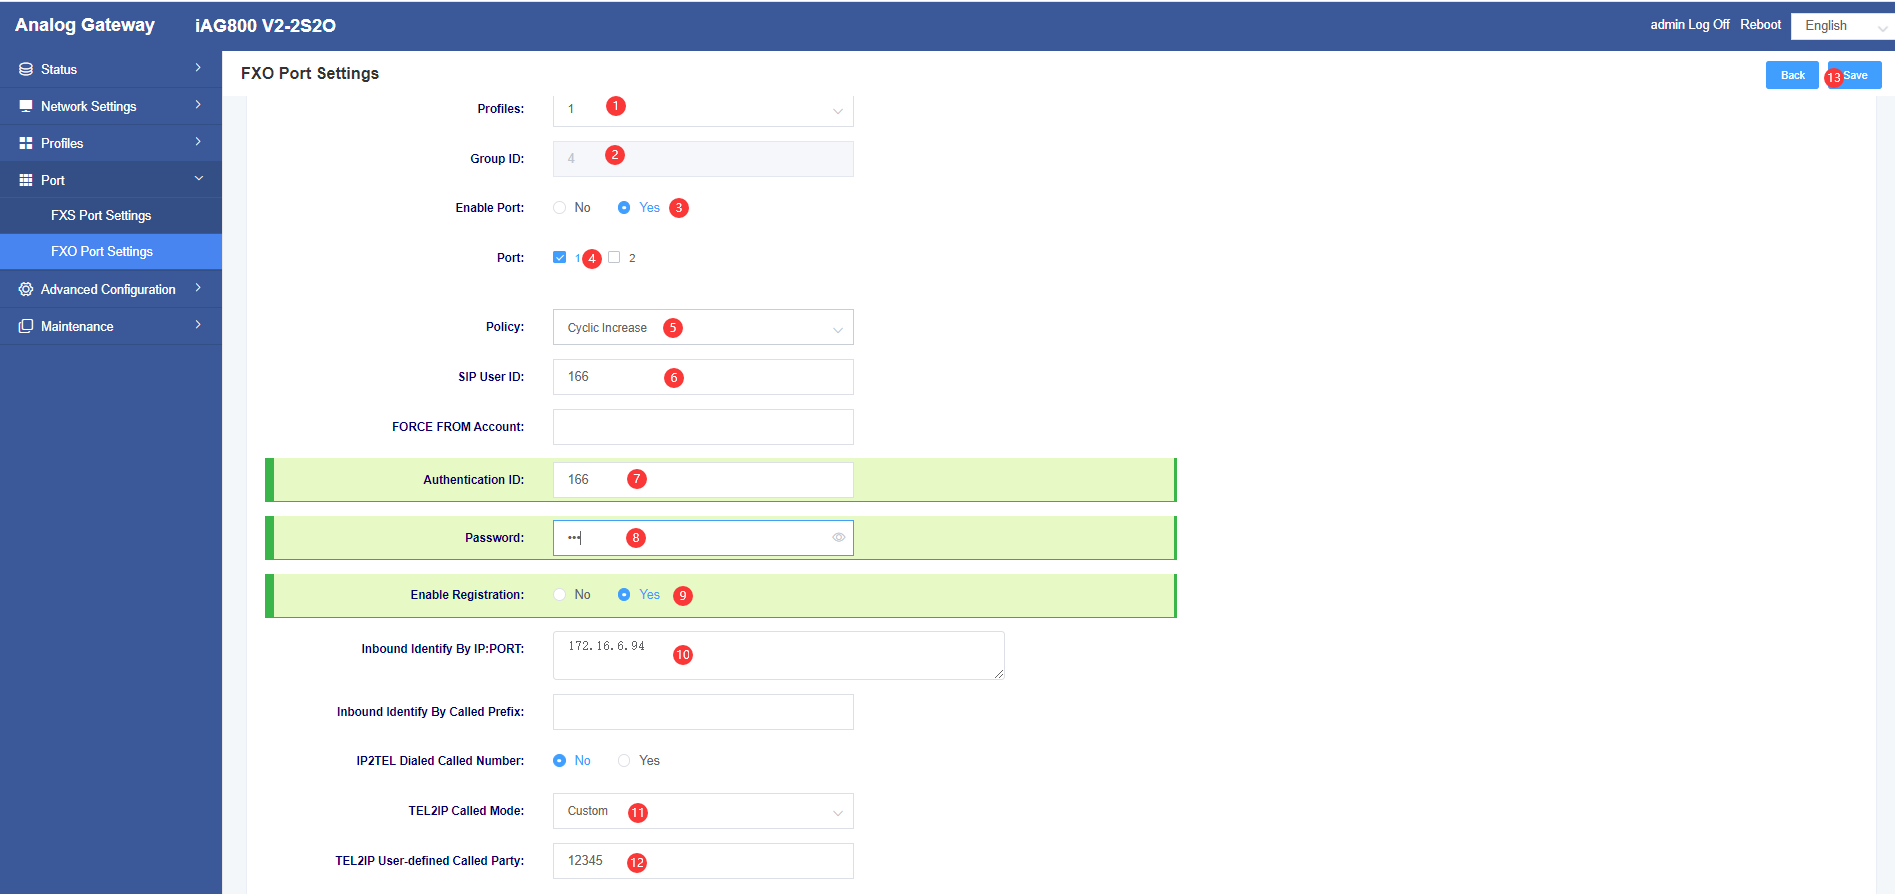
We can check whether the trunk status is docked successfully on the web of iAG800. Docking is successful when the port status is registered.

Dialing test
When the above configuration is complete, inbound and outbound calls to the phone will work as described below.
Outbound call
SIP extensions registered to the FreePBX can dial 0+ phone numbers to reach external numbers in the PSTN network, as we have set up in the FreePBX’s outbound routing.
Example:
The customer dials 0 + 135XXXXXXXXXX from an analogue handset connected to the iAG800, the 0 is removed and 135XXXXXXXX is dialed.
Inbound call
A number from an external user can dial a PSTN line that passes through the iAG gateway and is sent to the FreePBX for processing. Depending on the inbound routing of the FreePBX, calls from this trunk can be forwarded to an extension or other destination (e.g., a voice menu).
Example:
When a user dials a PSTN line number, which is a number provided by the PSTN service provider, it goes to the corresponding destination according to the inbound routing of the UC200. For example, if a user dials the first outside line (075512345), the setting goes to the voice menu; if the user dials the second outside line number (07551234), it goes to extension 5001.
