此文档主要描述业务板与FreeSwitch对接的详细步骤。
按照以下步骤配置,可以实现电话与网关之间的双向呼叫:
•呼出:从FreeSwitch SIP分机1000通过中继1008送到网关;
•呼入:从外线呼叫到网关,经由SIP 1020至FreeSwitch,再通过FreeSwitch把呼叫送到1000 SIP分机上;

以下步骤中,表格中的参数为必填配置,其他参数可以根据自己的需求配置。
步骤1:在FreeSwitch中创建sip中继
输入FreeSWITCH的默认配置目录,然后在/etc/freeswitch/directory/default/1008.xml中添加网关的配置:
vi /etc/freeswitch/directory/default/1008.xml
<include>
<user id="1008">
<params>
<param name="password" value="1008"/>
<param name="vm-password" value="1008"/>
</params>
<variables>
<variable name="toll_allow" value="domestic,international,local"/>
<variable name="accountcode" value="1008"/>
<variable name="user_context" value="default"/>
<variable name="effective_caller_id_name" value="Extension 1008"/>
<variable name="effective_caller_id_number" value="1008"/>
<variable name="outbound_caller_id_name" value="$${outbound_caller_name}"/>
<variable name="outbound_caller_id_number" value="$${outbound_caller_id}"/>
<variable name="callgroup" value="techsupport"/>
</variables>
</user>
</include>
参数名称 |
参数值 |
user id |
1008 |
password |
1008 |
effective_caller_id_name |
分机1008 |
effective_caller_id_number |
1008 |
注:以上配置为默认配置,无需修改
步骤2:在FreeSwitch上创建sip分机(1000)
<include>
<user id="1000">
<params>
<param name="password" value="1000"/>
<param name="vm-password" value="1000"/>
</params>
<variables>
<variable name="toll_allow" value="domestic,international,local"/>
<variable name="accountcode" value="1000"/>
<variable name="user_context" value="default"/>
<variable name="effective_caller_id_name" value="Extension 1000"/>
<variable name="effective_caller_id_number" value="1000"/>
<variable name="outbound_caller_id_name" value="$${outbound_caller_name}"/>
<variable name="outbound_caller_id_number" value="$${outbound_caller_id}"/>
<variable name="callgroup" value="techsupport"/>
</variables>
</user>
</include>
参数名称 |
参数值 |
user id |
1000 |
password |
1000 |
注意:以上配置为默认配置,无需修改
步骤3:在FreeSwitch中添加入局和出局路由
入局路由:
编辑入局路由文件 /etc/freeswitch/dialplan/public/00_inbound_did.xml
<include>
<extension name="public_did">
<condition field="destination_number" expression="1020">
<!--
If you're hosting multiple domains you will want to set the
target_domain on these calls so they hit the proper domain after you
transfer the caller into the default context.
$${domain} is the default domain set from vars.xml but you can set it
to any domain you have setup in your user directory.
-->
<action application="set" data="domain_name=$${domain}"/>
<!-- This example maps the DID 5551212 to ring 1000 in the default context -->
<action application="transfer" data="1000 XML default"/>
</condition>
</extension>
</include>
参数名称 |
参数值 |
destination_number |
1020 |
data |
1000 XML default |
出局路由:
编辑出局路由文件 /etc/freeswitch/dialplan/default.xml
<extension name="outbound">
<condition field="destination_number" expression="^9(\d+)$">
<action application="answer"/>
<action application="set" data="ringback=${us-ring}"/>
<action application="bridge" data="sofia/internal/[email protected]"/>
</condition>
</extension>
参数名称 |
值 |
呼出路由名称 |
outbound |
expression |
^9(\d+)$, 9开头的号码会匹配这条路由 |
data |
sofia/internal/[email protected] |
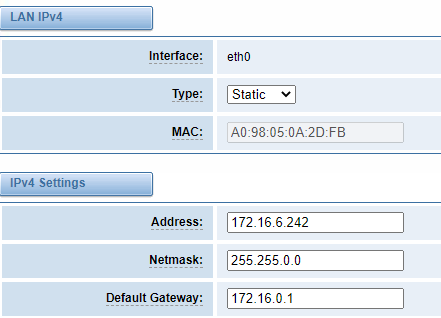
步骤4:在Web中设置网络参数
在浏览器中登录网络,在单击“网络->LAN设置”可以设置你的网络参数,下图是一个仅供参考的示例。
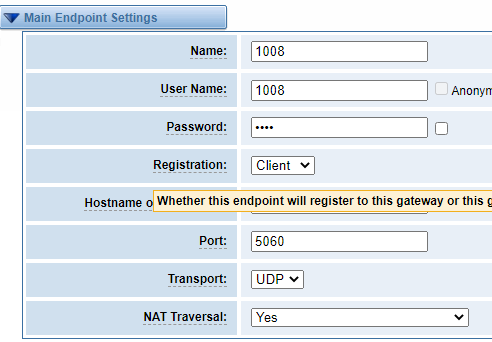
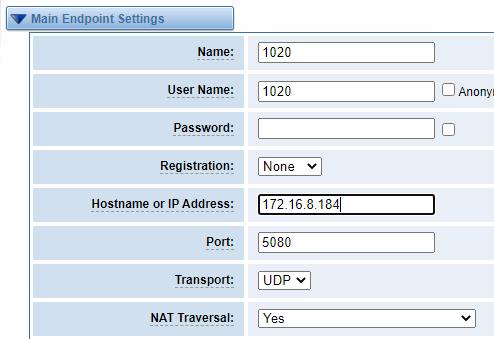
步骤5:在Web中创建SIP中继1008和不验证的1020端点
请选择“ VOIP-> VOIP设置->添加新的SIP终端”以设置SIP中继。下图显示了有关如何设置的详细信息。
关于SIP中的其他参数,请根据您的要求进行设置,因为无需在简单的调用中进行设置。
参数名称 |
值 |
中继名称 |
1008 |
中继用户名称 |
1008 |
中继密码 |
1008 |
注册方式 |
客户端 |
IP地址 |
服务器的IP地址(FreePBX的IP地址):172.16.80.43 |
端口 |
默认是5060 |
传输方式 |
默认UDP |
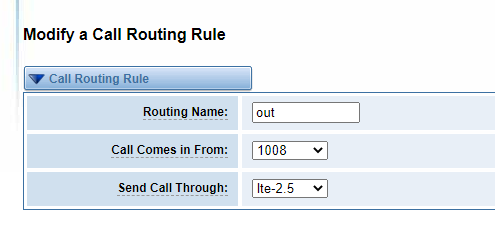
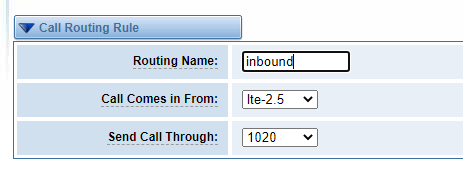
步骤6:在Web中设置路由规则
单击“路由—>呼叫路由规则—>新呼叫路由规则”以设置出站和入站路由规则,如下所示:
呼出路由:
参数名称 |
值 |
路由名称 |
outbound |
呼叫来自 |
中继1008 |
呼叫送达 |
Lte-2.5 |

呼入路由:
参数名称 |
值 |
路由名称 |
inound |
呼叫来自 |
Lte-2.5 |
呼叫送达 |
1020 |
请保存并应用所有设置.
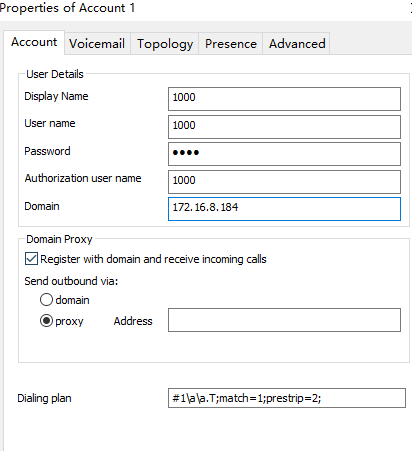
步骤7:用软电话注册分机(1000)
可以使用Xlite,eyeBeam,microsip等SIP软件注册SIP扩展名(1000)。下图是Xlite配置1000示例。
测试呼叫:
呼入测试:用手机拨打网关上端口2.5的号码,看1000是否振铃,振铃说明配置成功;如果未振铃,请检查配置
呼出测试:在注册了1000的软电话拨打自己的手机号码,如果自己手机振铃,说明配置成功;如果没有振铃,说明配置失败,请检查配置
父主题: WTU