UScale Simple Business Configuration
UScale Simple Service Configuration
Calling Number Display
Feature Configuration
By default, the user has the business permission. To reconfigure, perform the following steps:
1. Log in to the X1900 Series Unified Gateway web management system using an administrator account.
2. In User Management> SIP User or User Management> POTS User, select the number to be added with business permission, and click Business Configuration “.
3. Select the business to be opened in the Simple Business area and click OK “.
Feature usage
Assume that user A has calling number display service authority. User B calls user A, and the number of user B will be displayed on the phone of user A.
Calling Number Display Restrictions
Feature Configuration
1. Log in to the X1900 Series Unified Gateway Web Management System using an administrator account.
2. In User Management> SIP User or User Management> POTS User, select the number to be added with business permission, and click Business Configuration “.
3. In the “Simple Service” area, select “Calling Number Display Restrictions” and click “OK”.
Feature Use
The user A opens the calling number display restriction, calls the user B, and the user B displays the Anonymous on the phone.
Calling number display limit exceeded
When the user acts as the caller, the number of the user (I. e., the calling number) can be displayed on the terminal of the called user.
Feature Configuration
By default, the user has the business permission. To reconfigure, perform the following steps:
1. Log in to the X1900 Series Unified Gateway web management system using an administrator account.
2. In User Management> SIP User or User Management> POTS User, select the number to be added with business permission, and click Business Configuration “.
3. In the “Simple Service” area box, select the calling number display limit to exceed, and click “OK”.
Feature Use
Assume that user A has the calling number display restriction override service right. User B calls user A, and the number of user B will be displayed on the phone of user A.
Call park
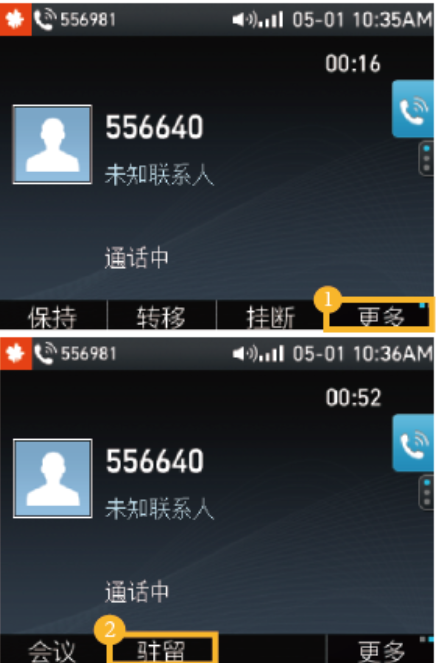
The user can put the current call on hold and then resume the held call on another phone in the office. If the user does not resume the call within the set time, the system will release the call and the held party will listen to the busy tone.
Feature Configuration
By default, the user has the business permission. To reconfigure, perform the following steps:
1. Log in to the X1900 Series Unified Gateway web management system using an administrator account.
2. In User Management> SIP User or User Management> POTS User, select the number to be added with business permission, and click Business Configuration “.
3. Select the business to be opened in the Simple Business area and click OK “.
Feature usage
Analog phone
park the current call
Tapping a fork on the analog phone of the current call and dialing “* 95#”.
Retrieve the parked call
Dial “* 95 * TN#” on any analog phone to resume the call on hold.
Note: TN is the number of the phone that just resided.
IP phone
park the current call
Retrieve Resident Phone
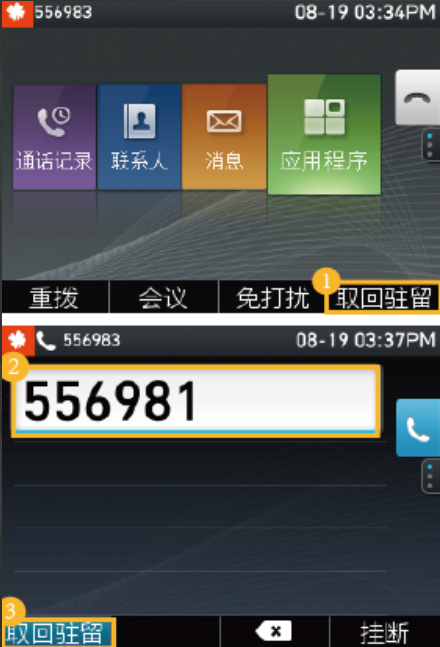
In fact, for each resident and retrieval resident operation, it can be completed by different types of terminals. For example, a user can park a call on an analog phone and then retrieve the call on an IP Phone phone.
Absent business
After the user registers the absent service, other users will hear an absent prompt tone when calling the user.
Feature Configuration
By default, the user has the business permission. To reconfigure, perform the following steps:
1. Log in to the X1900 Series Unified Gateway web management system using an administrator account.
2. In User Management> SIP User or User Management> POTS User, select the number for which you want to add business permissions, and click Business Configuration “.
3. Select the business to be opened in the Simple Business area and click OK “.
Feature Use
Register or cancel business
The user dials “* 50#” and can hear the prompt tone for successfully registering the business.
The user dials “#50#” and can hear the prompt tone of successfully canceling the service.
Use Business
Assume that the user A registers an absent service.
The user B calls the user A and hears the prompt tone of the absence of the called user.
Description: User A can call out normally during the service effective period.
Revoke all business
Cancels all supplementary services registered by a user, but the user’s business permissions are not affected.
Feature Configuration
By default, the user has the business permission. To reconfigure, perform the following steps:
1. Log in to the X1900 Series Unified Gateway web management system using an administrator account.
2. In User Management> SIP User or User Management> POTS User, select the number for which you want to add business permissions, and click Business Configuration “.
3. In the Simple Business area, select the business to be added and click OK “.
Feature Configuration
The user dials “#22 * SSSSSS#” and can hear the prompt tone of successfully registered service, and all supplementary services registered by the user are canceled. SSSSSS is the voice service password of the user.
CRBT
Play personalized ring tones to the calling party.
Feature Configuration
1. Choose User Management> Global Business “.
2. Click “CRBT”
3. Click Select to select the CRBT file. Click Upload to upload the selected CRBT file to the system
4. In User Management> SIP User or User Management> POTS User, select the number for which you want to add business permissions, and click Business Configuration “.
5. Select the business to be opened in the Simple Business area and click OK “.
Feature Use
Registered CRBT:
- Dial the signature * 100#
For example, a company has opened a CRBT service, and when a customer calls the company, they will hear the CRBT.
Cancel CRBT:
- Dial signature #100#
Do Not Disturb
In order to avoid the interruption of incoming calls, the user can temporarily stop the system from calling his own phone or soft terminal.
Feature Configuration
By default, the user has the business permission. To reconfigure, perform the following steps:
1. Log in to the Web management system of the X1900 Series Unified Gateway using an administrator account.
2. In User Management> SIP User or User Management> POTS User, select the number for which you want to add business permissions, and click Business Configuration “.
3. Select the business to be opened in the Simple Business area and click OK “.
Feature Use
- Permission: User Management-> SIP User Management-> Service Configuration-> Simple Service-> Check Do Not Disturb-> OK
- Registration service: user off-hook-> dial feature code “* 56#” -> hear the sound of successful registration
Use Business
After A is registered, other users call A and other users will hear busy tone
Revocation of business
User off hook-> dials feature code “#56#” -> hears a successful revocation tone
Immediate Meeting
The user does not need to book the meeting in advance, and directly initiates the meeting on the terminal device or the Web conference management interface.
Feature Configuration
Activate Instant Meeting Permission
Immediate meeting requires the user to have the Immediate meeting permission, and other configurations are the same as the appointment meeting. By default, the user has the business permission. To reconfigure, perform the following steps:
1. Log in to the X1900 Series Unified Gateway Web Management System using an administrator account.
2. In User Management> SIP User or User Management> POTS User, select the number for which you want to add business permissions, and click Business Configuration “.
3. Select Immediate Meeting in the Simple Business area box and click OK “.
Feature Use
Prerequisites
The convener of the meeting needs to open the immediate meeting authority.
Initiate an Instant Conference (X1900 Series Unified Gateway Web Interface)
Describes the method for immediate voice conferencing on X1900 Series Unified Gateways.
1. Log in to the Web self-service system of the X1900 Series Unified Gateway as a 81000 user.
2. Click Immediate Meeting “.
The system immediately initiates a meeting invitation to the convener and joins the meeting after receiving the invitation.
3. Click “Add Attendees” to add other members to the meeting, such as 81001 and 81002.
4. Click OK, and the system will initiate a meeting invitation to the 81001 and 81002, and join the instant meeting after answering the invitation.
Initiate an instant conference (IP phone)
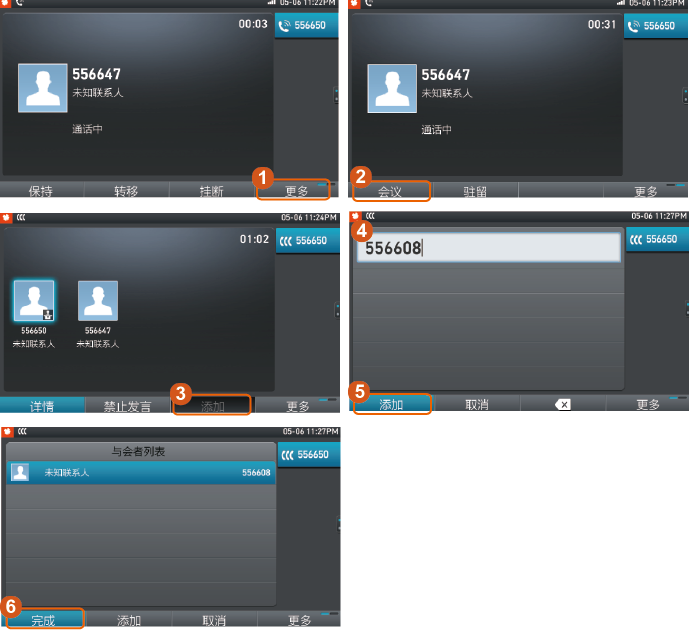
During a call, the user calls a third-party user to initiate an instant conference as shown in FIG. 3.
Figure 3 Instant Conference Initiation
Initiate an instant meeting (POTS phone, not recommend)
1. Dial the conference access code.
2. Press “2” after hearing the prompt tone of “Welcome to conference call, press 1 to access conference and press 2 to create instant conference”.
3. After entering the meeting, press the fork key to call other participants to join the meeting.
4. After clapping the fork, select 1 to call the user.
5. Dial the user number after the prompt dials, connect the user, and cross again after the call.
Select 1 to agree to the user’s participation, at which time both parties join the meeting.
Select 2 to reject the user’s attendance. At this time, the chairman returns to the meeting and the user listens to the busy tone.
Call Transfer
The user exits the call by himself or herself by pressing the transfer key to transfer the call to the third party during the call.
Feature Configuration
By default, the user has the business permission. To reconfigure, perform the following steps:
1. Log in to the U1900 Series Unified Gateway web management system using an administrator account.
2. In User Management> SIP User or User Management> POTS User, select the number to be added with business permission, and click Business Configuration “.
3. Select the business to be opened in the Simple Business area and click OK “.
Feature Use
Analog phone
1. User A and User B are on the phone.
2. User A beats the fork and User B listens to the waiting music.
3. After hearing the dial tone, user A dials the number of user C to transfer the call.
- Semi-consulting transfer mode
After the user A hears the ringing of the user C, the user A hangs up again and exits, and the user B makes a call with the user C.
- Consultation transfer mode
User A makes a simple dialogue consultation with User C, User C confirms that it is necessary to answer the call, User A hangs up and exits, and User B makes a call with User C.
Note: If user C is busy or does not answer the phone, user A can press the fork or wait 25 seconds to resume the call with user B.
IP phone
1. User A and User B are on the phone.
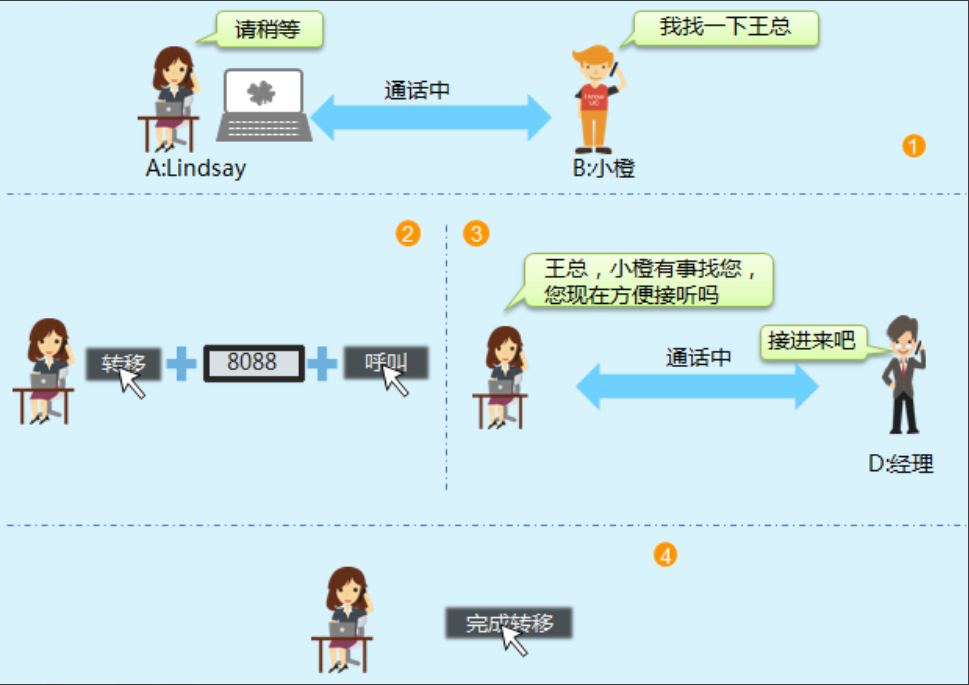
2. User A presses the “Transfer” soft key and User B listens to the waiting music.
3. User A dials the number of user C to perform call forwarding.
- Blind transition, as shown in Figure 1.
Fig. 1 Blind rotation
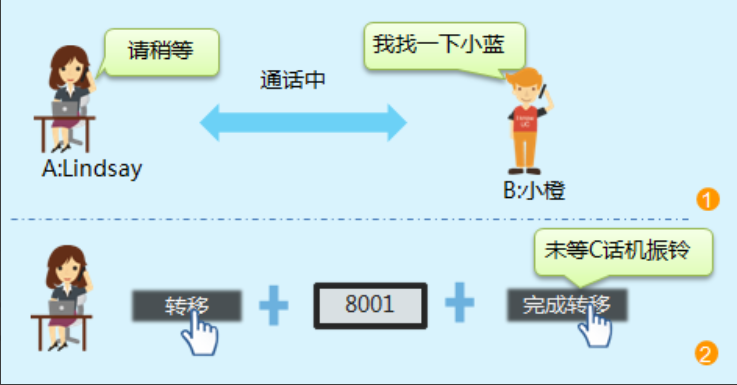
- The semi-advisory transfer method is shown in Figure 2.
Figure 2 Semi-Advisory Turn
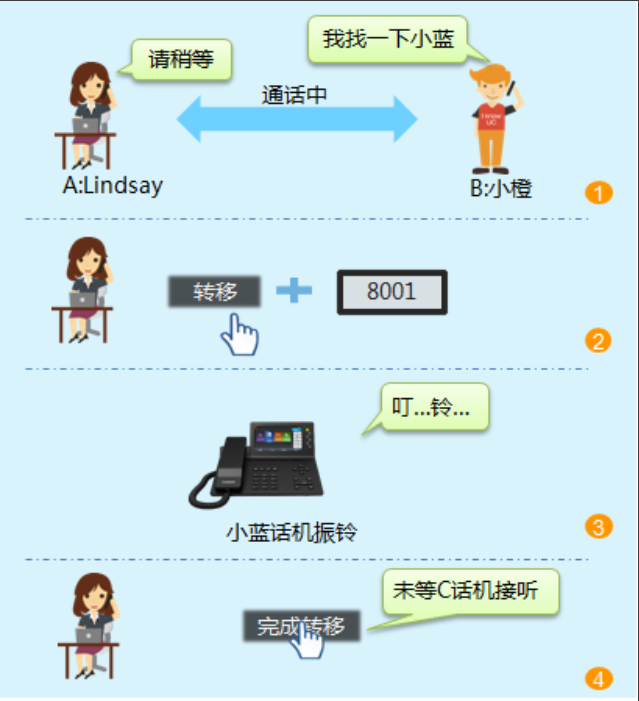
- The consultation transfer method is shown in Figure 3.
Figure 3 Consultation Transfer
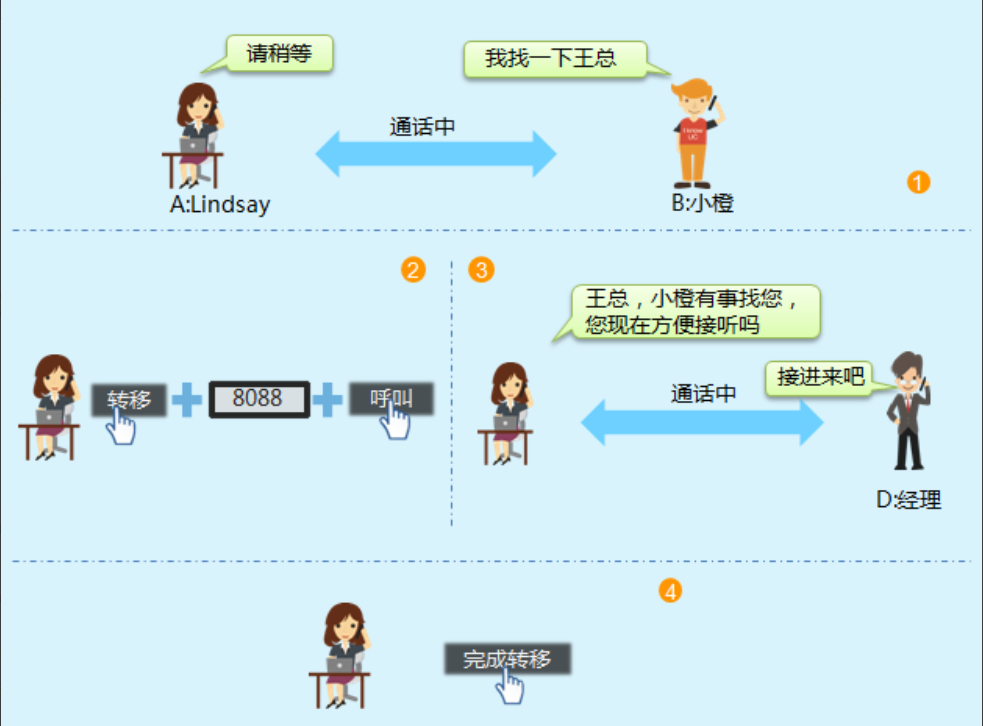
4. User B makes a call with User C or User D.
Desktop Soft Client
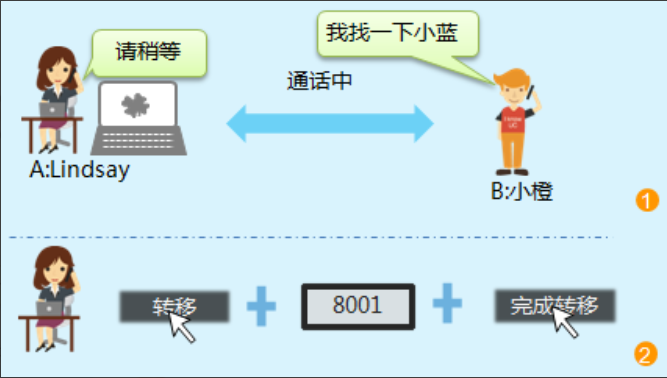
1. User A and User B are on the phone.
2. User A clicks… in the call window and selects “Transfer> Other Numbers”.
3. User A Select User C and click Transfer “.
- Blind transition, as shown in Figure 4.
Figure 4 Blind rotation
- shown in Figure 5.
Figure 5 Semi-Advisory Turn
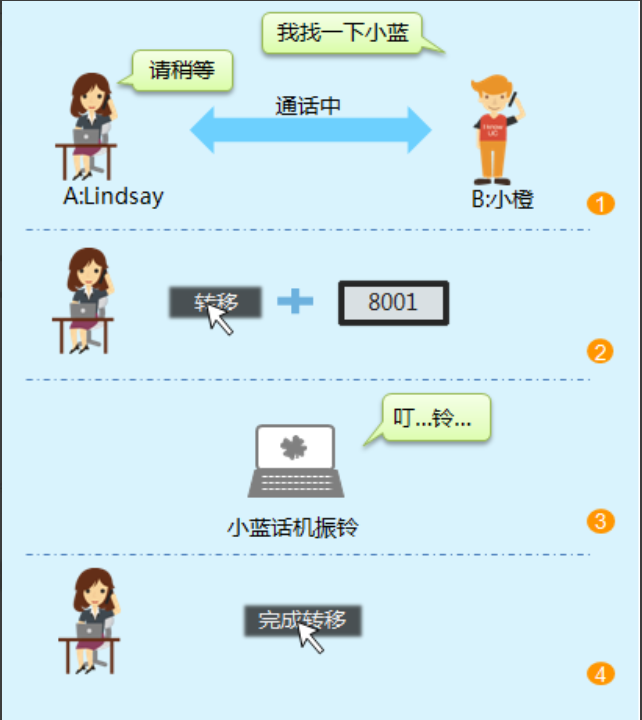
The consultation transfer method is shown in Figure 6.
Figure 6 Consultation Transfer
4. User B makes a call with User C or User D.
On behalf of the answer
A user uses one phone to answer a ringing call on another phone. Designated Pickup means that the user uses one phone to answer a call that the designated phone is ringing. The same group answering means that users can use a 1 phone to answer incoming calls from a ringing phone in the same group.
Feature Configuration
Answer on behalf of the same group
1. Log in to the X1900 Series Unified Gateway Web Management System using an administrator account.
2. Choose User Management> SIP User “.
Description:
If the user to be activated is a POTS user, choose User Management> POTS User “.
3. Select the number to which you want to add business permissions and click Business Configuration “.
4. If you need to use the push function of IP phone answering, please check “Specify answering” in the “Simple Business” area “.
5. In the Complex Business area, click Configure next to Answer in the Same Group “.
6. In the “Configure the same group for answering” area, enter the number of the answering group to be configured, as shown in the following figure.
Figure 1 Configuring the same group for answering

Description:
- If the group does not exist, you can use this procedure to create a group and add the current user to the group. If the Pickup Group already exists, only the current user will be added to the Pickup Group.
- Supports configuring the same user into two generation groups through the Web management page.
- Before configuring a generation group, you can view the users bound to the group on the Search for Same Group page to avoid binding unrelated users to the same group.
7. Click OK “.
Designated Pickup
1. Log in to the X1900 Series Unified Gateway Web Management System using an administrator account.
2. In User Management> SIP User or User Management> POTS User, select the number for which you want to add business permissions, and click Business Configuration “.
3. Select the business to be opened in the Simple Business area and click OK “.
Limited Assigned Pickup
1. Log in to the X1900 Series Unified Gateway Web Management System using an administrator account.
2. In User Management> SIP User or User Management> POTS User, select the number for which you want to add business permissions, and click Business Configuration “.
3. In the “Simple Business” area, select “Limited Assigned Pickup” and click “OK”.
4. Log in to the X1900 Series Unified Gateway Web Self-Service System with the user number.
5. Choose Self Service> Business Registration> Trust List, click Create, and configure a trust number.
6. Click OK “.
Feature Use
Answer on behalf of the same group
Assume that user A and user B are in the same answering group, and user C is another user. As shown in Figure 1.
IP Phone 7900 Series / Video Phone8950]
Figure 1 Scenario of the same group answering
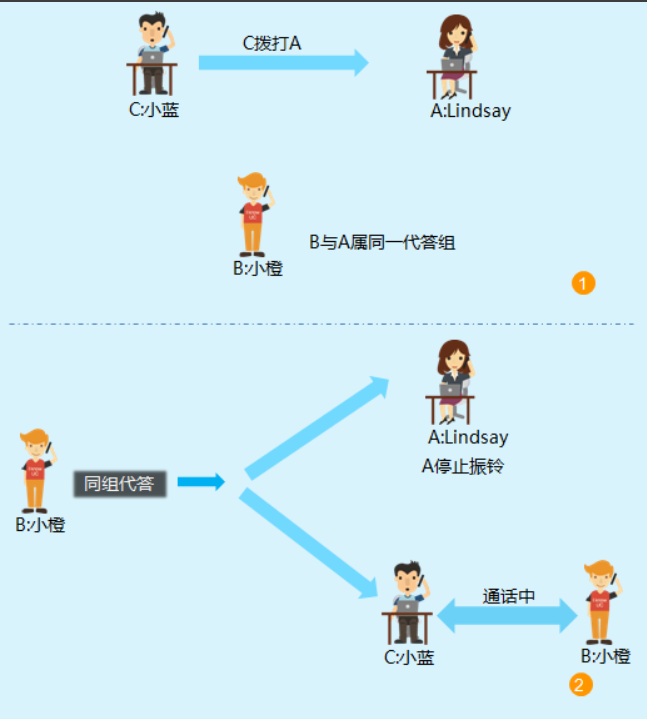
other types of terminals]
1. User C dials User A, and User A’s phone rings.
2. User B dials “* 11#” off-hook, and User A’s phone stops ringing.
3. User B starts a call with User C.
Designated Pickup
Assume that user A has the permission to specify a proxy service, and user B and user C are other users. As shown in Figure 2:
IP Phone 7900 Series / Video Phone8950]
Figure 2 Designated Pickup Scenario
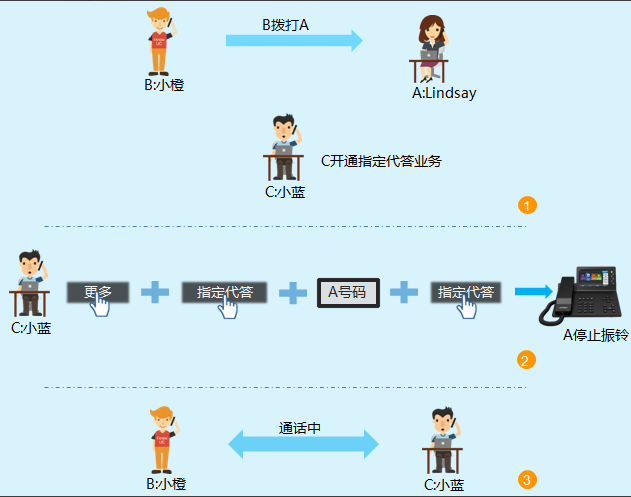
other types of terminals]
1. User B dials User A, and User A’s phone rings.
2. User C dials “* 11 * TN#” off-hook, and User A’s phone stops ringing. Where TN is the number of user A.
3. User C starts a call with User B.
Automatic callback
After the user dials a busy or unanswered internal phone, the system will automatically call the calling phone and the called phone when the dialed user is available after registering for callback.
Feature Configuration
By default, in-office users and Qsig relay users have the right to return busy calls and no answer calls. If you need to use the busy call back and no answer call back functions of cross-SIP trunk, SIP trunk users need to turn on the support subscription function of the trunk. By default, POTS users with normal, advanced, or special privileges have the ability to register calls on a busy schedule.
Web Configuration
The X1900 supports Web configuration of Busy Callback, No Answer Callback, and Busy Deposit Call services for POTS users.
1. Log in to the X1900 Series Unified Gateway Web Management System using an administrator account.
2. In User Management> SIP User or User Management> POTS User, select the number for which you want to add business permissions, and click Business Configuration “.
3. Select “Call Back in Busy”, “Call Back in No Answer” and “Call Back in Busy” in the “Simple Service” area box, and click “OK”.
4. On the Trunk Management> Trunk Configuration> SIP page, double-click the SIP trunk connection and set the support subscription to Yes in the pop-up window “.
For the X1900, you need to configure this step if you want to use the busy call back and no answer call back features across SIP trunking.
Feature Use
Call back in case of busy
Users can use the busy callback function when they are busy, as shown in Figure 1.
Registration Business
1. User A goes off-hook and dials the user of the enterprise.
2. The called user is busy, and user A listens to the prompt tone.
3. User A registers the callback service according to “5”
Figure 1 Busy Callback
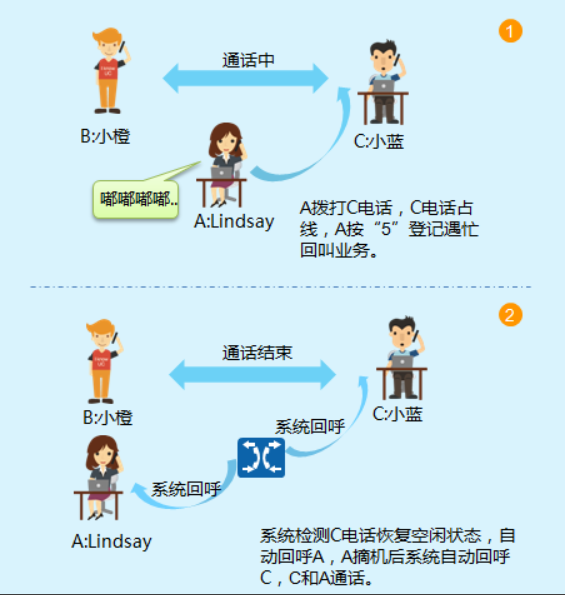
Note: If the service needs to be canceled, A can dial “#59#”, or after registering the busy call back, the system realizes the busy call back and the service is automatically canceled.
No answer callback
The user can use the no answer callback function in the case of no answer, as shown in Figure 2.
Registration Business
1. User A goes off-hook and dials the user of the enterprise.
2. The called user has no answer, and user A listens to the prompt tone.
3. User A presses “5” to register the callback service.
Figure 2 No answer callback
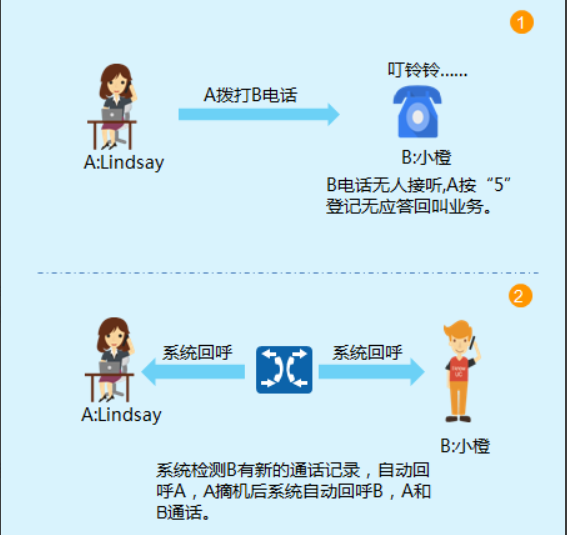
Note: If the service needs to be revoked, A can dial “#60#”, or after registering no-response callback, the system realizes no-response callback and the service is automatically revoked.
Busy Deposit Call
When the user is busy calling, the call is registered, and the called user can be called automatically without dialing within 5 seconds of the next off-hook.
Registration Business
User A goes off-hook → dial the called user → listen to the busy tone (the called user is busy) → beat the fork → listen to the dial tone → dial “* 53#” to hear the prompt tone for successful registration of the service.
1. User A goes off-hook and dials the user of the enterprise.
2. The called user is busy, and the user A listens to the prompt tone.
3. User A can listen to the dial tone and dial “* 53#” to hear the prompt tone of successful registration.
Use Business
User A goes off-hook and waits for 5 seconds, and the phone will automatically initiate a call to the called user registered last time.
Description:
- If the called user is idle, it will be connected automatically and the registered call will be canceled.
- If the called user is busy, you can still call again, valid for 20 minutes.
Revocation of business
User A goes off-hook and dials “#53#” to hear the prompt tone of successfully canceling the service.
Description:
The business will be automatically canceled if one of the following conditions is met:
- The registered call is automatically canceled after the called subscriber is called through the busy registered call service.
- Automatic cancellation after 20 minutes of registration.
Anonymous limited call
If the system cannot obtain the calling subscriber number, this call will be prohibited and the called subscriber’s telephone will not ring.
Feature Configuration
Perform the following steps to configure:
1. Log in to the X1900 Series Unified Gateway Web Management System using an administrator account.
2. In User Management> SIP User or User Management> POTS User, select the number for which you want to add business permissions, and click Business Configuration “.
3. Select the business to be opened in the Simple Business area and click OK “.
On-demand recording
On-demand recording means that during a call, the user presses the recording key on the phone to start recording according to actual needs. During the recording process, press the recording key to stop recording, or stop recording automatically after stopping the call. On-demand recording is only valid for one call. During each call, recording is required and a separate key is required to start.
Feature Configuration
Open business
User Management-> SIP User Management-> Service Configuration-> Simple Service-> Check on-demand recording-> OK
Use Business
During the call, the user presses the recording key or * 1 on the phone to start recording, and presses it again or the call ends to stop recording.
Revocation of business
User Management-> SIP User Management-> Service Configuration-> Simple Service-> Uncheck On-Demand Recording-> OK
Automatic recording
Automatic recording means that when the designated user starts a call, the system automatically starts recording, and when the call is ended, the system automatically stops recording. On-demand recording and automatic recording will take effect at the same time if they are turned on at the same time. Automatic recording will be triggered first. The on-demand recording key is the stop recording key at this time.
Feature Configuration
Open business
User Management-> SIP User Management-> Service Configuration-> Simple Service-> Check Auto Recording-> OK
Use Business
When the user starts a call, the system automatically starts recording, and when the call ends, the system automatically stops recording, or you can press the recording key or the * 1 key to stop recording
Revocation of business
User Management-> SIP User Management-> Service Configuration-> Simple Service-> Uncheck Automatic Recording-> OK
Three-way call
On the basis of not interrupting the current call, the user can call the third-party user to implement the three-party common call.
Feature Configuration
By default, the user has the business permission. To reconfigure, perform the following steps:
1. Log in to the X1900 Series Unified Gateway Web Management System using an administrator account.
2. In User Management> SIP User or User Management> POTS User, select the number for which you want to add business permissions, and click Business Configuration “.
3. Select the business to be opened in the Simple Business area and click OK “.
Feature Use
Initiator is an IP phone
Notice:
The IP phone corresponding to the user A needs to set at least two lines before the three-way call can be realized.
1. User A and User B are on the phone, and User A presses the “Conference” soft key.
2. Press the Add softkey to enter the number of third party user C.
3. Press the Add and Finish softkey.
4. User C answers the phone.
Users A, B, and C enter a three-way call state.
Initiator is analog phone
1. When user A is talking with user B, user A needs to talk with user C and press the fork key. At this time, user B is called and held.
2. User A dials the telephone number of user C after hearing the dial tone.
3. If user C answers, user A talks to user C. Thereafter, user A claps a fork to implement a three-way call.
Description:
- During a call between the user A and the user C, if one party hangs up, the other party makes a call with the user B.
- During a three-party call, if one of User B and User C hangs up, User A keeps or switches to the one who does not hang up. If User A hangs up, the other two parties listen to busy tone.
4. If user C does not answer, user A forks and resumes the call with user B.
Call Waiting
When a user is on a call, if a third-party user calls the user, the user will receive a call waiting prompt tone, indicating that another user is waiting for a call with the user.
Feature Configuration
By default, the user has the business permission. To reconfigure, perform the following steps:
1. Log in to the X1900 Series Unified Gateway Web Management System using an administrator account.
2. In User Management> SIP User or User Management> POTS User, select the number to be added with business permission, and click Business Configuration “.
3. Select the business to be opened in the Simple Business area and click OK “.
Feature Use
Registration and revocation
- Off-hook, dial “* 58#”, you can hear the tone of successful registration business.
- Off-hook, dial “#58#” and you can hear the prompt tone of successful cancellation of business.
Business Use
The user A and the user B are on a call. At this time, the user C calls the user A, the user A hears a call waiting prompt tone, and the user C hears a prompt tone or a ring back tone. User A has 15 seconds to make the following choices:
- Reject the incoming call from user C.
Do not do any operation, wait for the prompt tone to disappear automatically after more than 15 seconds, user C listens to the busy tone, and user A and user B continue to talk.
- End the call with user B and change the call with user C.
Beat the fork first, and then press the “1” key after hearing the voice prompt.
- Keep talking to user B and talk to user C instead.
Beat the fork first, and then press the “2” key after hearing the voice prompt.
When the user A is talking with the user C, if the “2” key is pressed after the fork, the call with the user B will be switched back, and the user C listens to the ring back tone.
When user a is talking with user c, if user c hangs up, user a hears the voice prompt and then claps a fork to resume talking with user B; If user a hangs up, both user B and user c will listen to busy tone.
IP phone
Registration and revocation
1. On the LCD page, select Application> Personalization> Call Service> Call Waiting “.
2. Turn call waiting on or off.
Business Use
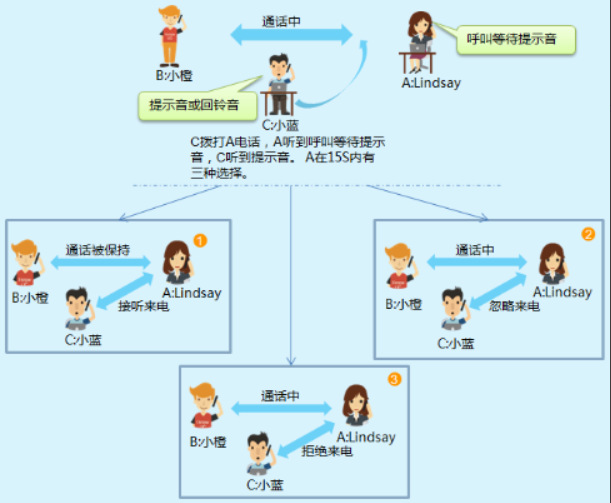
The user A and the user B are on a call. At this time, the user C calls the user A, the user A hears a call waiting prompt tone, and the user C hears a prompt tone or a ring back tone. User A can make the following choices within 15 seconds, as shown in Figure 1.
Figure 1 IP phone call waiting service usage scenario
Desktop Soft Client
Registration and revocation
The desktop soft client has the call waiting function turned on by default, and you can receive new calls during the call or meeting. If you need to activate this service, please enable call waiting. The specific steps are as follows.
1. Click the avatar area in the main interface.
The system pops up the “Settings” window.
2. In the navigation bar, click Call and select Turn on Call Waiting “.
3. Click OK “.
Business Use
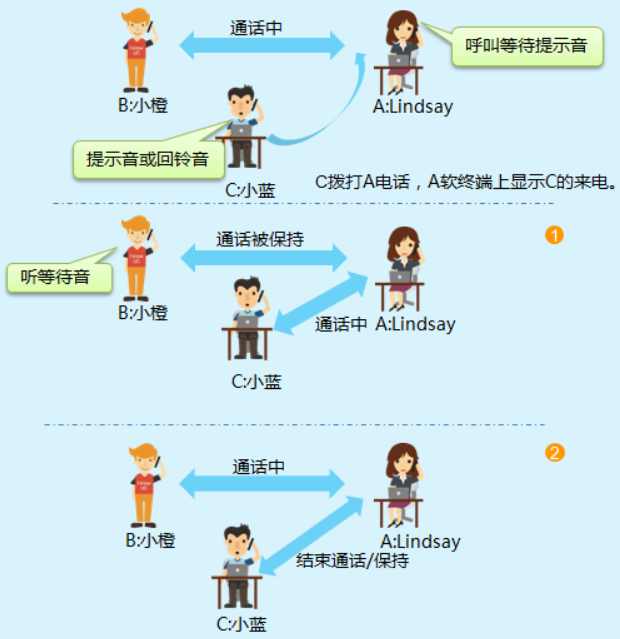
User B is talking to user A, and the desktop soft client shows an incoming call from user C. After user A clicks “Answer”, a call is established with C, and the call with user B is maintained. At this point, user B will hear the waiting tone played by the system. As shown in Figure 2.
Figure 2 Desktop Soft Client Call Waiting Service Usage Scenario
multi-way call
The user can handle multiple calls at the same time on a single phone, including incoming and outgoing calls, but can only make one voice call at the same time, and other calls are in a holding state.
Feature Configuration
By default, the user has the business permission. To reconfigure, perform the following steps:
1. Log in to the X1900 Series Unified Gateway Web Management System using an administrator account.
2. In User Management> SIP User or User Management> POTS User, select the number to be added with business permission, and click Business Configuration “.
3. Select the business to be opened in the Simple Business area and click OK “.
Feature Use
Multiple calls under the same SIP user
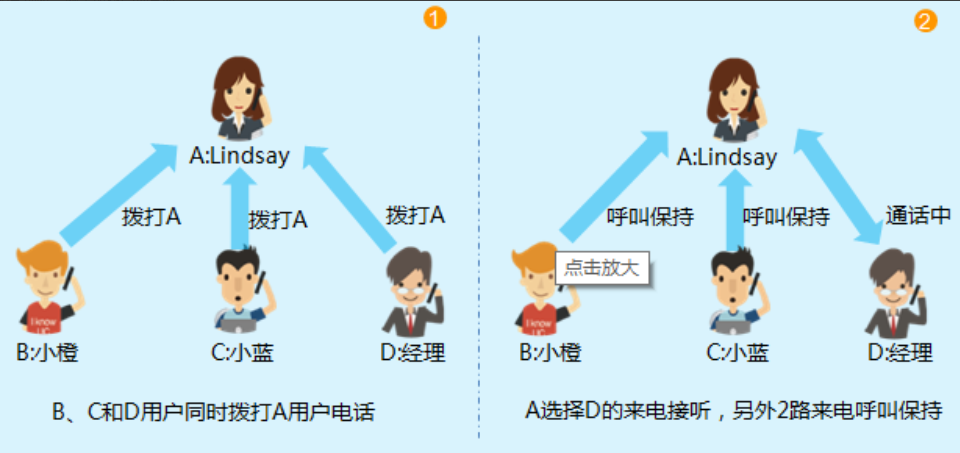
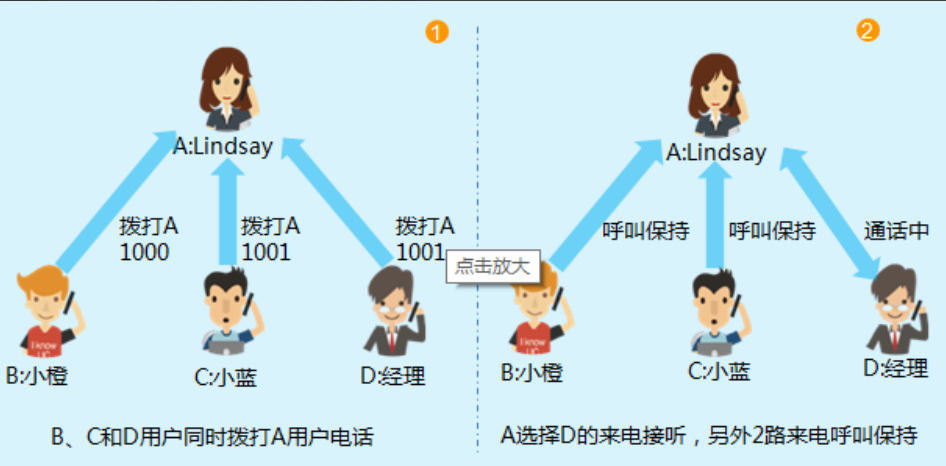
Only one SIP account is configured on the terminal of the user A, and the account is configured with three lines. When there is an incoming call on the three lines at the same time, the user A can choose any way to answer. As shown in Figure 1.
Figure 1 Multi-call scenario under the same SIP user
Multi-way calls with multiple SIP users
Two SIP accounts 1000 and 1001 are configured on the terminal of user A, and two lines are configured for each account. When there are three users calling the user A, there is one incoming call on the account 1000, and there are two incoming calls on the account 1001, the user A can choose any one way to answer. As shown in Figure 2.
Figure 2 Multi-call scenario with multiple SIP users
abbreviated dialing
The user uses a self-numbered number instead of a longer telephone number. Self-numbered numbers are also called abbreviated numbers. Using abbreviated numbers can reduce dialing time and facilitate memory.
Feature Configuration
By default, the user has the business permission. To reconfigure, do the following.
Web Configuration Method
1. Log in to the X1900 Series Unified Gateway Web Management System using an administrator account.
2. In User Management> SIP User or User Management> POTS User, select the number for which you want to add business permissions, and click Business Configuration “.
3. Select the business to be opened in the Simple Business area and click OK “.
Feature Use
Registration Business
Register business via phone
User A with abbreviated dialing service permission goes off-hook → dial “* 51 * MN * TN#” and can hear the prompt tone of successful registration service.
Description:
- MN is a 2-bit abbreviated code with values ranging from 00 to 99.
- TN is the number of the abbreviated subscriber B.
Business registration through Web self-service
1. Log in to the U1900 Series Unified Gateway Web Self-Service System with a normal user account.
2. On the Self-Service tab page, click the Business Registration tab.
3. Click Indent Dialing “.
4. On the abbreviated dial tab page, click Create to set the abbreviated code and user number, as shown in the following figure.
Figure 1 Configuring abbreviated dialing

5. Click OK “.
Use Business
A off-hook → dial “* * 01” to initiate a call to B. “01” is the abbreviated number set by the user.
Revocation of business
You can revoke an abbreviated code or revoke all registered abbreviated codes:
Undo an abbreviated code
A off-hook → dial “#51 * MN#” to hear the prompt tone of successful cancellation of business.
Undo all abbreviated codes
A off-hook → dial “#51#” to hear the prompt tone of successful cancellation of business.
Alarm Clock
The phone rings automatically at a time set by the user to alert the user.
Feature Configuration
The administrator can configure the user’s alarm business on the Web page, and the user can register or cancel the alarm business on the web self-service system and his own phone.
1. Log in to the X1900 Series Unified Gateway Web Management System using an administrator account.
2. In User Management> SIP User or User Management> POTS User, select the number to be configured and click Service Configuration “.
3. In the Simple Business area, check Alarm Clock “.
You must select Alarm Clock to configure Alarm Clock in Complex Business and Alarm Clock in web self-service system “.
4. In the Complex Business area, click Configure after Alarm “.
5. Enter the set time, as shown in Figure 1.
Figure 1 Configuring the alarm

Note: To cancel the alarm clock business, you can uncheck the “alarm clock” checkbox in the “simple business.
6. Click OK “.
Feature Use
Register or cancel business
Register business via phone
The user dials “* 55 * HHMM#” and can hear the prompt tone for successfully registering the business.
Description:
- HH is the two-hour value of the alarm clock, and the effective range is 00~23.
- MM is the two minute value of the alarm clock, and the effective range is 00~59.
The user dials “#55#” and can hear the prompt tone of successfully canceling the service.
Business registration through Web self-service
1. Log in to the X1900 Series Unified Gateway Web Self-Service System with a normal user account.
2. On the Self-Service tab page, click the Business Registration tab.
3. Click Alarm Clock “.
4. In the “Alarm Clock” tab, set the time and click “OK”, as shown in the following figure

Note: To cancel the alarm business, you can click Close Business “.
Use Business
Assume that the user registers the alarm clock service. At the predetermined time, the user terminal rings automatically. At this point:
- The user answers and can hear the reminder voice. After the user hangs up, the alarm clock service is automatically canceled.
- The user is busy or unanswered (that is, no one answers within one minute of ringing), and the system initiates a call to the user again five minutes later. If the user is still busy or there is no answer, the alarm service will be automatically canceled.
co-vibration
A user binds a plurality of numbers to a main number, and when an incoming call is made to the main number, terminals of the main number and other bound numbers will ring at the same time, and after any terminal answers, the other terminals will stop ringing.
Feature Configuration
1. Log in to the X1900 Series Unified Gateway Web Management System using an administrator account.
2. In User Management> SIP User or User Management> POTS User, select the number for which you want to add business permissions, and click Business Configuration “.
3. Open the ringing business authority.
X1900 supports the opening of the ring business rights and then configure the ring business.
Select Ring in the Simple Business area to activate the ring business permission.
After activating the ring business permission here:
- Administrators can configure ringing services in the Complex Business area;
- Users can also configure ringing services in the Web self-service system.
4. Configure the ringing service.
The specific business configuration process is described by taking the administrator operation as an example.
- In the Complex Business area box, click Configure after Ringing “.
- In the displayed Configure Ringer dialog box, select Same Vibration and set the number, as shown in Figure 1.
Figure 1 Configuring the same vibration service
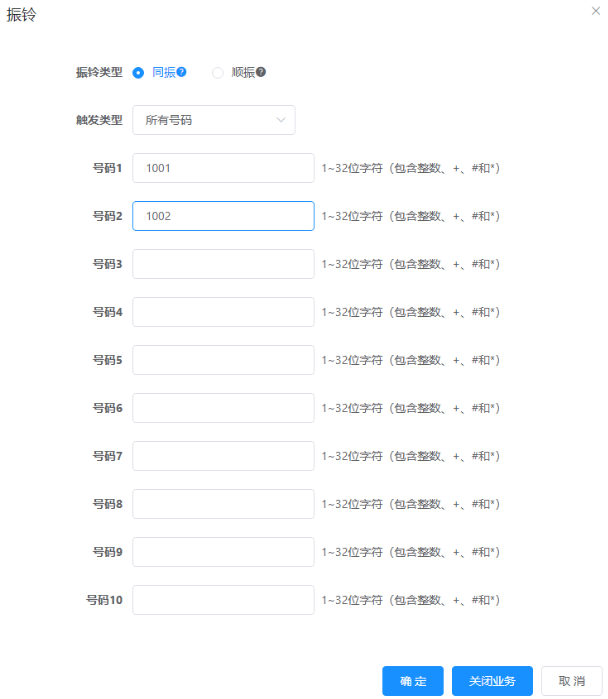
Description
In the Configure Ring dialog box, click Close Business to delete the same vibration business permission.
Shun vibration
A user binds multiple numbers to a main number, and when an incoming call is made to the main number, terminals of the main number and other bound numbers will ring in turn, and after any terminal answers, other terminals will stop ringing.
Feature Configuration
Configure Shun Service
1. Log in to the X1900 Series Unified Gateway Web Management System using an administrator account.
2. In User Management> SIP User or User Management> POTS User, select the number for which you want to add business permissions, and click Business Configuration “.
3. Open the ringing business authority.
X1900 supports the opening of the ring business rights and then configure the ring business.
Select Ring in the Simple Business area to activate the ring business permission.
After activating the ring business permission here:
- Administrators can configure ringing services in the Complex Business area;
- Users can also configure ringing services in the Web self-service system.
4. Configure the ringing service.
The specific business configuration process is described by taking the administrator operation as an example.
- In the Complex Business area box, click Configure after Ringing “.
- In the displayed Configure Ringer dialog box, select Shun Vibration and set the number, as shown in Figure 1.
Figure 1 Vibration service configuration
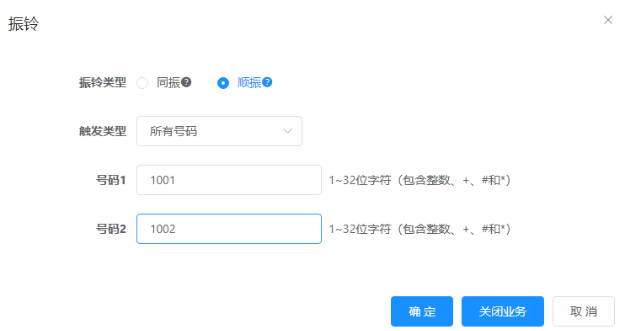
Description
In the Configure Ringing dialog box, click Close Business to delete the Shunting business permission.
Feature Use
It is assumed that user A has the ringing service authority, and the numbers of users B and C are set as the vibration numbers of A, and D is other users.
1.D dial A.
2. If A does not go off-hook within 20 seconds, A stops ringing and B starts ringing.
3. If B does not go off-hook within 20 seconds, B stops ringing and C starts ringing.
4.C goes off-hook and starts talking with D.
Description
If A goes off-hook within 20 seconds, B will not ring. If B goes off-hook within 20 seconds, C will not ring. 20 seconds is the default ringing duration, configurable.
Secretary
Secretarial business means that the secretary can manually screen calls to the manager.
Secretary desk business refers to when the secretary is busy, the call enters the queue, when the secretary is free, the system transfers the call in the queue to the secretary again.
Feature Configuration
Opening permission
- User Management-> SIP User Management-> Business Configuration-> Simple Business-> Check Secretary-> OK
Registered Business
- User Management-> SIP User Management-> Business Configuration-> Complex Business-> Secretary-> Configure
- Manager A dials * 77 * TN# and can hear the tone of successful registration of the business, then the manager opens the secretarial business.
- Secretary B dials * 77 * DN * SSSSSS# and can hear the prompt tone of successful registration of business, then the secretary opens the secretarial business.
- Secretary B dials “* 78#” and can hear the tone of successful registration of business, then the secretary opens the secretarial desk business.
Revocation of business
- User Management-> SIP User Management-> Business Configuration-> Complex Business-> Secretary-> Configure
- Manager A dials “#77#” and can hear the prompt tone of successful cancellation of the business, then the manager cancels the secretarial business.
- Secretary B dials “#77 * DN#” (DN is the number of Manager A) and can hear the prompt tone of successful cancellation of the business, then the secretary cancels the secretarial business.
- Secretary B dials “#78#” and can hear the prompt tone of successful cancellation of the business, then the secretary cancels the secretarial desk business.
Feature Use
Secretarial business:
- User C calls Manager A, Secretary B’s phone rings
- Secretary B answers, talking to user C
- Secretary B presses the “Transfer” soft key, enters the number of Manager A, and then presses the “Call” soft key. During this time, user C listens to waiting music
- Manager A answers and speaks to Secretary B.
- If Manager A agrees to answer the call from User C, Secretary B presses the “Complete Transfer” soft key. Thereafter, Manager A calls User C
Secretary desk business:
- User C calls Manager A, and Secretary B’s phone rings.
- Secretary B answers and speaks to user C. Secretary B chooses whether to transfer the call to Manager A.
- While Secretary B is busy, another user D calls Manager A. The user D listens to the ring back tone.
- Secretary B hangs up, Secretary B’s phone rings, and Secretary B can answer user D’s call. If the secretary B does not hang up within 1 minute after the user D starts to listen to the ring back tone, the user D listens to the busy tone.
Strong insertion and strong disassembly (used by operator)
1. Strong plug-in: In the call between A and B, dial C: * 80 * A#, or *80 * B#. C is inserted into the call between A and B. A, B and C can talk to each other. Hanging up C does not affect AB call. Hanging up A or B, C also hangs up. In a, B and c calls, d does not allow forced insertion.
2. forced disassembly: during the call between a and B, dial c: * 81 * A# or *81 * B#, c interrupts the call between a and B, and c plays busy tone. During the call between A, B and C, D is not allowed to be demolished.
3. Strong plug-in and overstep: If the called number service opens strong plug-in and overstep or the called number opposite service opens strong plug-in and overstep, strong plug-in cannot be performed.
4. Demolition Overpass: If the called number service opens a forced demolition overpass or the called number opposite service opens a forced demolition overpass, the forced demolition cannot be carried out.
Feature Configuration
1. Strong insertion
- SIP user management, select SIP user C, service configuration, simple service selection strong plug;
- During AB call, C dials * 80 * A# and inserts A and B calls;
- During ABC call, d dials * 80 * A# to prompt: your new business operation is unsuccessful;
2. forced demolition
- SIP user management, select SIP user C, carry out service configuration, simple service selection and forced demolition;
- During AB call, C dials * 81 * A# to interrupt A and B calls.
- During ABC call, C dials * 81 * A# and prompts: Your new service operation is unsuccessful.
3. Strong insertion and overstepping
- SIP user management, select SIP user C, service configuration, simple service selection strong plug-in.
4. Demolition Overpass
- SIP user management, select SIP user C, service configuration, simple service selection forced to overrun.
Strong for (Operator)
The user can forcibly replace an ongoing two-party call.
Feature Configuration
1. Log in to the X1900 Series Unified Gateway Web Management System using an administrator account.
2. In User Management> SIP User or User Management> POTS User, select the number for which you want to add business permissions, and click Business Configuration “.
3. In the “Simple Business” area box, force it and click “OK”.
Feature Use
1. The operator can initiate a forced replacement request through the attendant interface. The operator must have the forced replacement authority, and the forced replacement number has not been opened and the forced replacement override authority has not been opened;
2. The operator performs strong replacement by dialing the characteristic code * 82 * TN#. The operator must have strong replacement authority, and the strong replacement number has not been opened;
Dedicated Line
Outcoming call line: supports configuring users to allow only outgoing calls but not incoming calls.
Incoming call line: supports configuring users to allow only incoming calls but not outgoing calls.
Feature Configuration
Administrators can configure the user’s private line business on the Web page,
1. Log in to the X1900 Series Unified Gateway Web Management System using an administrator account.
2. In User Management> SIP User or User Management> POTS User, select the number to be configured and click Service Configuration “.
3. In the “Simple Business” area box, select “Outcoming Line, Incoming Line”.
Web opening:
User Management-> SIP, POTS User Management-> Service Configuration-> Simple Service-> (Check) Outcoming and Incoming Dedicated Lines-> OK
Feature Use
1. User A opens an outgoing line, then User A calls out User B, and User B calls in User A will play the voice “Call is restricted, do not use beyond your authority”
2. User B opens an incoming call line, then User A calls into User B, and User B calls out User A to play the voice “Call is limited, please do not use beyond your authority”
Shutdown
The user opens the shutdown and plays the shutdown voice to the calling party.
Feature Configuration
1. Log in to the X1900 Series Unified Gateway Web Management System using an administrator account.
2. In User Management> SIP User or User Management> POTS User, select the number to be configured and click Service Configuration “.
3. In the “Simple Business” area box, select Shutdown.
Feature Use
User A opens the shutdown, then user B calls out user A will play the voice “Sorry, your user has stopped”
